Thanks!
FPN
eBay seller YesPen. Genuine 616 Jumbos at a good price, no messing about.
Jim Mamoulides' Attack of the Clones article
Jim Mamoulides' Eversharp 5th Avenue article
Ernst's/Ravensmarch's Mig Versus Phantom article
LaPlumaFuente's How a Push-Button Fountain Pen Works video
No Thanks!
Sunsets at 4:30 p.m.
Wednesday 7 December 2011
Hero 616 Button Filler - Final Mindthots
There are two main areas I'd improve if I attempted a mark II button filling Hero 616; the length of the blind cap, and the type of trim rings used.
Blind Cap Length
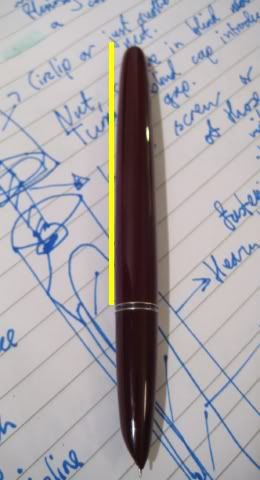
The blind cap could really be cut at any point along the barrel's length without affecting functionality. As a consequence of using the cutting method described in an earlier post, the blind cap was cut unusually long, so that its range of movement is roughly in the yellow area highlighted in the photo below.
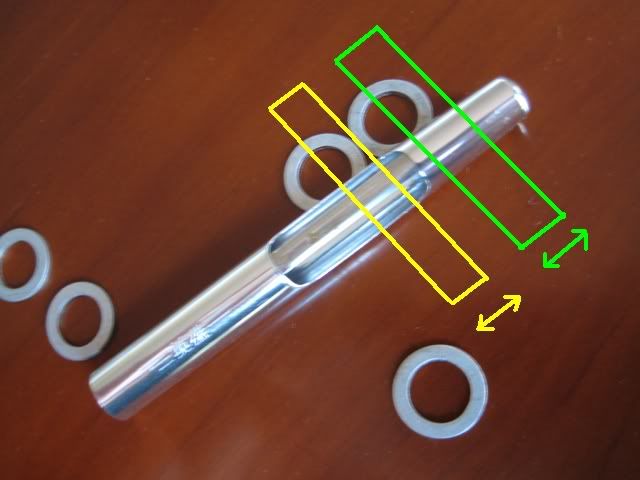
If the blind cap were cut shorter - more like the size of most factory fitted fountain pen blind caps - then the range of its movement would be in the green highlighted area of the steel cage. This would look neater, as the ink sac would be completely concealed from every angle, even with the blind cap removed.
If anyone in the UK has a 616 Jumbo ink sac cage/protector going spare, do please contact me using the comment button below this post, or P.M. 'Flounder' on FPN, I'll buy it from you.
Trim Rings
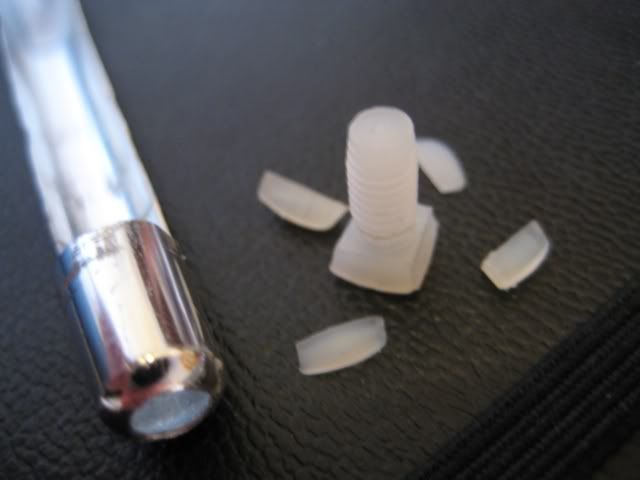
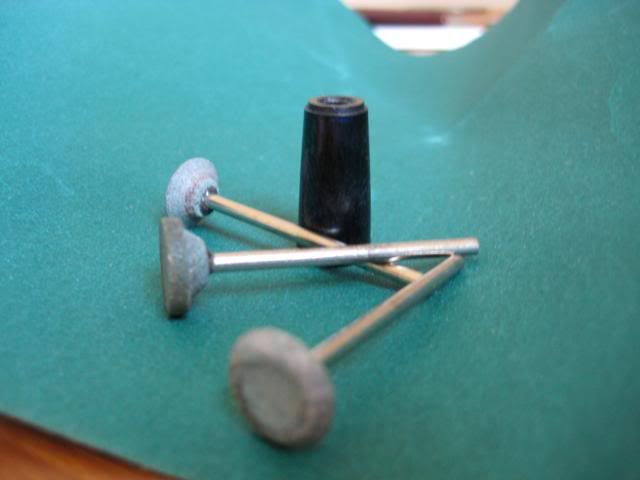
Here's a macro shot of a typical aluminium crush washer from the 10 pack I bought on eBay. I'm sure that they're great in the application they were intended for, but as trim rings, they're less than perfect.

The two faces highlighted in green are pretty much straight and true, while the two faces highlighted in yellow are bowed outward in one case and sloping in the other. This creates problems making the blind cap sit straight with the barrel. I tried to sand the trim rings straight, and it did help, but it's not an ideal situation - an uncalled for extra hurdle.
These crush washers are the only metal washers I could find* with a inner diameter large enough and outer diameter small enough to fit the blind cap in the position it was cut. There would be less of a hassle of the blind cap were cut further up the barrel, where the thicker barrel wall allows a larger range of washers, or if I weren't so averse to cannibalising clutch rings from another 616.
Using a plastic or rubber o-ring would be even cheaper, certainly more symmetrical, and perhaps more in keeping with the 616's Parker 51 style understated aesthetic. If installed on the black model photographed in an earlier post, a black rubber o-ring would be pretty innocuous.
* I've since spotted 10x12 mm shims from internet hobby shops that look promising - google for part number HPI-Z892.
As a parting shot, why don't Parker have a go at manufacturing these - not in another ill-fated attempt at a prestige heritage model, but as a simple, attractive mid level pen that trades on its ancestor's reputation rather than competes with it? Minor 5th Avenue style hood striations would be an inexpensive visual differentiator for those familiar with its heritage, and for new audiences, serve as a tactile reminder of which way round to hold it.
With thicker plastic, a simple cartridge filler, and a modest range of nib sizes, they'd fly off the shelves. They're a far less daunting proposition than open nibbed pens as a transition from ballpoints to fountain pens.
Seasonal tidings of comfort and joy to one and all!
Flounder
Blind Cap Length
The blind cap could really be cut at any point along the barrel's length without affecting functionality. As a consequence of using the cutting method described in an earlier post, the blind cap was cut unusually long, so that its range of movement is roughly in the yellow area highlighted in the photo below.
If the blind cap were cut shorter - more like the size of most factory fitted fountain pen blind caps - then the range of its movement would be in the green highlighted area of the steel cage. This would look neater, as the ink sac would be completely concealed from every angle, even with the blind cap removed.
If anyone in the UK has a 616 Jumbo ink sac cage/protector going spare, do please contact me using the comment button below this post, or P.M. 'Flounder' on FPN, I'll buy it from you.
Trim Rings
Here's a macro shot of a typical aluminium crush washer from the 10 pack I bought on eBay. I'm sure that they're great in the application they were intended for, but as trim rings, they're less than perfect.
The two faces highlighted in green are pretty much straight and true, while the two faces highlighted in yellow are bowed outward in one case and sloping in the other. This creates problems making the blind cap sit straight with the barrel. I tried to sand the trim rings straight, and it did help, but it's not an ideal situation - an uncalled for extra hurdle.
These crush washers are the only metal washers I could find* with a inner diameter large enough and outer diameter small enough to fit the blind cap in the position it was cut. There would be less of a hassle of the blind cap were cut further up the barrel, where the thicker barrel wall allows a larger range of washers, or if I weren't so averse to cannibalising clutch rings from another 616.
Using a plastic or rubber o-ring would be even cheaper, certainly more symmetrical, and perhaps more in keeping with the 616's Parker 51 style understated aesthetic. If installed on the black model photographed in an earlier post, a black rubber o-ring would be pretty innocuous.
* I've since spotted 10x12 mm shims from internet hobby shops that look promising - google for part number HPI-Z892.
As a parting shot, why don't Parker have a go at manufacturing these - not in another ill-fated attempt at a prestige heritage model, but as a simple, attractive mid level pen that trades on its ancestor's reputation rather than competes with it? Minor 5th Avenue style hood striations would be an inexpensive visual differentiator for those familiar with its heritage, and for new audiences, serve as a tactile reminder of which way round to hold it.
With thicker plastic, a simple cartridge filler, and a modest range of nib sizes, they'd fly off the shelves. They're a far less daunting proposition than open nibbed pens as a transition from ballpoints to fountain pens.
Seasonal tidings of comfort and joy to one and all!
Flounder
Sunday 4 December 2011
Hero 616 - Filling Video
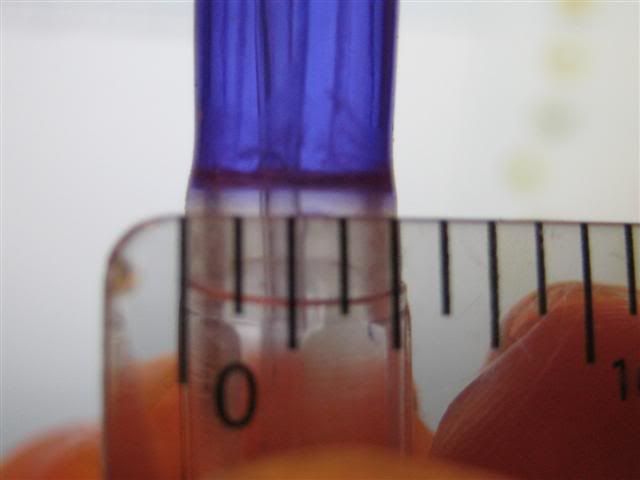
Here's a short clip of the 616 Jumbo button filler in operation, showing off its blind cap, and inking the pen from empty.
Average capacity per fill has been about .8ml, on a par with my Sheaffer Snorkel Sentinel.
Thanks for watching - final thoughts and future considerations round off this button filler design in the next post.
Flounder.
Thursday 1 December 2011
Hero 616 - Fitting the Button Filler
Knowing nothing about button fillers except that the Jumbo's generous proportions could easily accommodate a pressure bar, I found this excellent Youtube clip of a demonstrator in operation very helpful.
To see one working in action answered a lot of questions - it seemed that button filling is almost the antithesis of the long stroke, low internal stress touchdown system I first encountered many posts ago. A very short downward movement of the button pushes a lot of tension through the sprung steel strip. This steel deforms, pushes against the rigid barrel wall, and is forced to bow outward, compressing the flexible ink sack.
Pausing at 20 seconds in, my attention was held by the main stress points on one side of the plastic barrel - near the top and bottom of the ink sac, and, I suppose, below the ink sac where the end of the pressure bar sits. The thickness of that demonstrator's barrel plastic is easily thrice, maybe quadruple the Hero's, most likely to withstand stresses from the pressure bar flexing against it.
Main alterations to the steel cage
With this in mind, I turned my attention to the 616's factory squeeze filler cage assembly. This is a simple tapered metal tube with a piece of bent steel inserted to squeeze the ink sac using finger pressure.
It struck me that if the pressure bar worked against the steel wall of this cage rather than the weak plastic wall of the outer barrel, the pen would cope with the rigours of use far better. If the bottom end of the pressure bar was also hinged on the steel cage rather than dug into the plastic section near the sac nipple, then pretty much all the stress forces from using the pressure bar filler would be held internally within this steel cage.
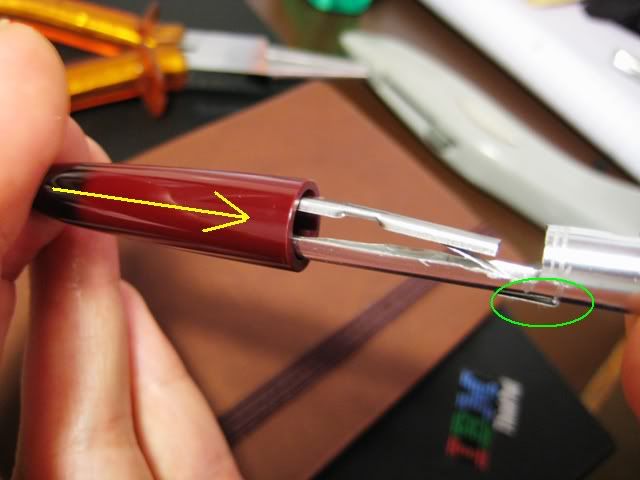
A picture says a thousand words, so here's 2000 words of exposition. This is the modified cage; the pressure bar is at idle, and the blind cap press button attached for this demonstration.
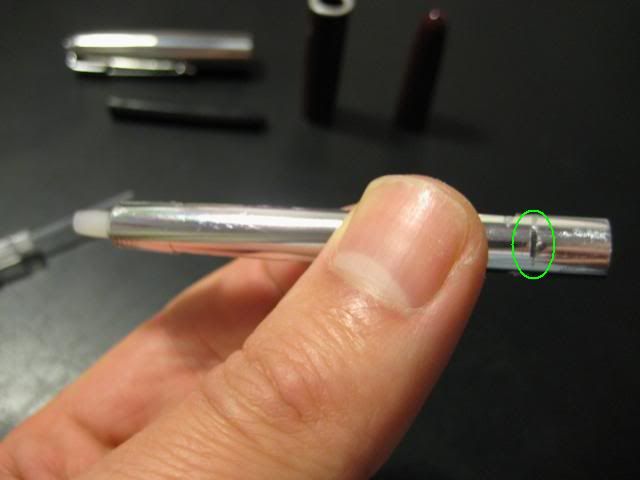
Now here's the pressure bar extended as the blind cap is pressed (in the direction of the yellow arrow). The bottom end of the pressure bar is held captive within the cage by a tight fold, which was made through a thin slot cut in the cage wall (circled in green). To see it in operation, I was surprised by the short distance the blind cap had travelled to fully extend the pressure bar into the sac cavity.
The sac cavity is unnecessarily large - this was before I used the new latex ink sac. I cut progressively more and more away from the steel cage to make it fit both the new pressure bar and the old silicon sac (I had the idea in my head that it wouldn't budge because it wanted more space to deform). If I try this again - and I'm quite tempted to - I would leave more of the old squeeze filler cage intact, at least a loop in the middle.
Still, there it is. First, I used pliers to pull out the original bent steel squeeze bar, and then, using the small cutting attachment on the mini drill, extended the original cavity to the size in the photo below. A hole was made in the top of the cage to accommodate the M4 nylon screw's shaft, which is fitted upside down - more on that below.
 The Taming of the Screw
A conventional blind cap has threads cut or molded into the plastic, to screw it on and off the barrel of the pen. Without a tap and die set, and being unable to find a suitable threaded insert as an alternative, the orthodox approach was out of the question.
This is where the nylon M4 screw and nut come in - the nut is glued inside the blind cap, while the screw is lodged upside down at the top of the modified cage. They solve two problems very nicely - how to make the blind cap screw on and off, and how to trigger the pressure bar. Deep breath:
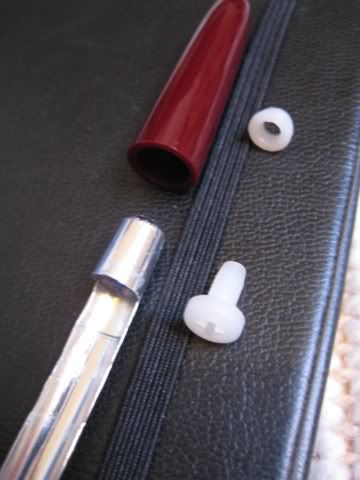
I went for nylon rather than steel parts so they could be shaped to fit the blind cap and sac cage easily. The head of the M4 screw below needs to be made smaller to fit in the cage, while the nut needs to shaped into a cone to better fit the inner walls of the blind cap.
Shaping the Blind Cap Nut
All this required was grinding down to make it a little thinner, and then making it cone shaped. I just secured it in the mandrel of the mini drill, and held it at a steady angle against sandpaper. I used an offcut from the sac to make the little gasket two photos above.
Shaping the Screw/Button
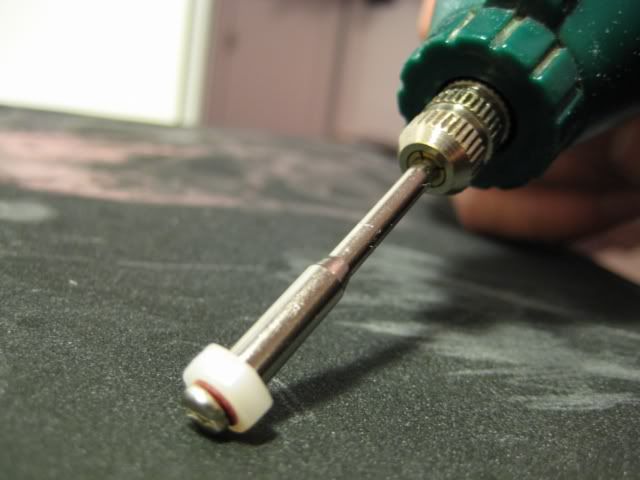
To lend a smooth action to depressing the screw, I ground off the first few threads. The rest were protected by a washer and two nuts from the 10 pack.

Then I cut the screw's head down to size, and sanded the outer edges smooth.
Final Alteration to the Cage, Installing the Pressure Bar
With the nylon screw ready, the pressure bar could be installed. I cut a slot in the cage (circled) just above where the sac attaches to the nipple. Then I held the pressure bar in place - tight against the screw - and scratched a mark on it through the slot, as an indicator of where to make the fold.
Then I put the screw inside the cage, lined up its head ready to slot in the top of the pressure bar, and tightened the blind cap nut over it. I shoved a little bluetack in the slot to make feeding the pressure bar in the right place easier.
Almost done:

With the pressure bar installed, the cage was ready to be fitted to the pen. Terrible photo, eh? I've superglued the trim ring (the only thing in focus) onto the barrel in this photograph.
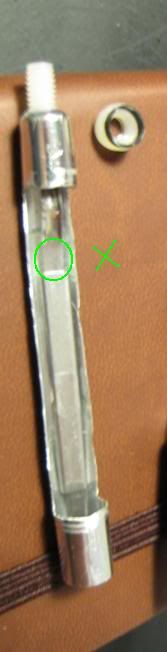
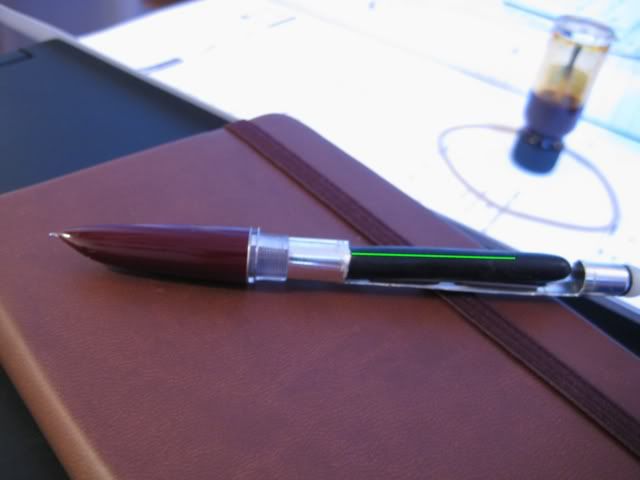
I positioned the cage so that the pressure bar was directly opposite the breather tube (MSPaint x-rayed in green). This way, the pressure bar would not have to fight the stiff breather tube to squeeze the ink sac, and I wanted to avoid stressing the breather tube anyway.
Final assembly of the blind cap and nut
The final step was to glue the blind cap to the nut. To ensure it lined up properly, I left the nut on the screw, applied superglue to the area highlighted in green, and held the blind cap tightly against the barrel for about 5 minutes. Then I let it set for about an hour before use, to give the glue time to bond properly.
I uploaded a short demonstration clip of this 616 in use to YouTube, embedded in the next post.
To see one working in action answered a lot of questions - it seemed that button filling is almost the antithesis of the long stroke, low internal stress touchdown system I first encountered many posts ago. A very short downward movement of the button pushes a lot of tension through the sprung steel strip. This steel deforms, pushes against the rigid barrel wall, and is forced to bow outward, compressing the flexible ink sack.
Pausing at 20 seconds in, my attention was held by the main stress points on one side of the plastic barrel - near the top and bottom of the ink sac, and, I suppose, below the ink sac where the end of the pressure bar sits. The thickness of that demonstrator's barrel plastic is easily thrice, maybe quadruple the Hero's, most likely to withstand stresses from the pressure bar flexing against it.
Main alterations to the steel cage
With this in mind, I turned my attention to the 616's factory squeeze filler cage assembly. This is a simple tapered metal tube with a piece of bent steel inserted to squeeze the ink sac using finger pressure.
It struck me that if the pressure bar worked against the steel wall of this cage rather than the weak plastic wall of the outer barrel, the pen would cope with the rigours of use far better. If the bottom end of the pressure bar was also hinged on the steel cage rather than dug into the plastic section near the sac nipple, then pretty much all the stress forces from using the pressure bar filler would be held internally within this steel cage.
A picture says a thousand words, so here's 2000 words of exposition. This is the modified cage; the pressure bar is at idle, and the blind cap press button attached for this demonstration.
Now here's the pressure bar extended as the blind cap is pressed (in the direction of the yellow arrow). The bottom end of the pressure bar is held captive within the cage by a tight fold, which was made through a thin slot cut in the cage wall (circled in green). To see it in operation, I was surprised by the short distance the blind cap had travelled to fully extend the pressure bar into the sac cavity.
The sac cavity is unnecessarily large - this was before I used the new latex ink sac. I cut progressively more and more away from the steel cage to make it fit both the new pressure bar and the old silicon sac (I had the idea in my head that it wouldn't budge because it wanted more space to deform). If I try this again - and I'm quite tempted to - I would leave more of the old squeeze filler cage intact, at least a loop in the middle.
Still, there it is. First, I used pliers to pull out the original bent steel squeeze bar, and then, using the small cutting attachment on the mini drill, extended the original cavity to the size in the photo below. A hole was made in the top of the cage to accommodate the M4 nylon screw's shaft, which is fitted upside down - more on that below.
The Taming of the ScrewA conventional blind cap has threads cut or molded into the plastic, to screw it on and off the barrel of the pen. Without a tap and die set, and being unable to find a suitable threaded insert as an alternative, the orthodox approach was out of the question.
This is where the nylon M4 screw and nut come in - the nut is glued inside the blind cap, while the screw is lodged upside down at the top of the modified cage. They solve two problems very nicely - how to make the blind cap screw on and off, and how to trigger the pressure bar. Deep breath:
- The screw itself does not rotate. The top end of the pressure bar (which, remember, is held captive in the metal cage) is lodged in the screw head slot, preventing any rotation.
- So in this case, the blind cap screws on and off the barrel via the nut glued inside it, which revolves around the unspinnable screw.
- The screw's head is wider than the hole cut to accommodate the screw's shaft, and so acts as a physical stop, preventing the screw from being pulled out from the top. This is a very clunky way of saying the only movement the screw can make is in a limited range, straight up and down. In turn, that's a clunky way of saying when the screw is pushed down, the pressure bar squeezes the ink sac.
- In the pressure bar on the left, notice the gap (circled) between the sprung steel and the sac pressing part. This is no good. I tried to fix it myself instead of sending it back, mangled it, and had to get a new one.
I went for nylon rather than steel parts so they could be shaped to fit the blind cap and sac cage easily. The head of the M4 screw below needs to be made smaller to fit in the cage, while the nut needs to shaped into a cone to better fit the inner walls of the blind cap.
Shaping the Blind Cap Nut
All this required was grinding down to make it a little thinner, and then making it cone shaped. I just secured it in the mandrel of the mini drill, and held it at a steady angle against sandpaper. I used an offcut from the sac to make the little gasket two photos above.
Shaping the Screw/Button
To lend a smooth action to depressing the screw, I ground off the first few threads. The rest were protected by a washer and two nuts from the 10 pack.
Then I cut the screw's head down to size, and sanded the outer edges smooth.
Final Alteration to the Cage, Installing the Pressure Bar
With the nylon screw ready, the pressure bar could be installed. I cut a slot in the cage (circled) just above where the sac attaches to the nipple. Then I held the pressure bar in place - tight against the screw - and scratched a mark on it through the slot, as an indicator of where to make the fold.
Then I put the screw inside the cage, lined up its head ready to slot in the top of the pressure bar, and tightened the blind cap nut over it. I shoved a little bluetack in the slot to make feeding the pressure bar in the right place easier.
Almost done:
With the pressure bar installed, the cage was ready to be fitted to the pen. Terrible photo, eh? I've superglued the trim ring (the only thing in focus) onto the barrel in this photograph.
I positioned the cage so that the pressure bar was directly opposite the breather tube (MSPaint x-rayed in green). This way, the pressure bar would not have to fight the stiff breather tube to squeeze the ink sac, and I wanted to avoid stressing the breather tube anyway.
Final assembly of the blind cap and nut
The final step was to glue the blind cap to the nut. To ensure it lined up properly, I left the nut on the screw, applied superglue to the area highlighted in green, and held the blind cap tightly against the barrel for about 5 minutes. Then I let it set for about an hour before use, to give the glue time to bond properly.
I uploaded a short demonstration clip of this 616 in use to YouTube, embedded in the next post.
Tuesday 29 November 2011
Hero 616 Button Filler - Fitting the Ink Sac
The factory fitted silicon ink sac is fine for its intended purpose, used in a squeeze filler 616 Jumbo. In a button filler, it had to go. A size 16 latex ink sac seemed to be a good fit.
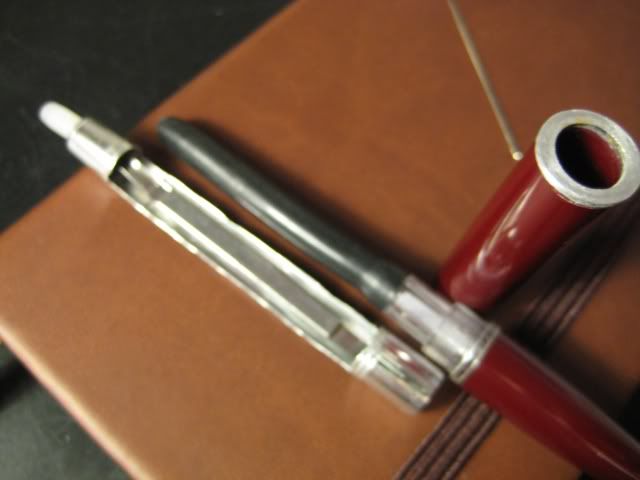
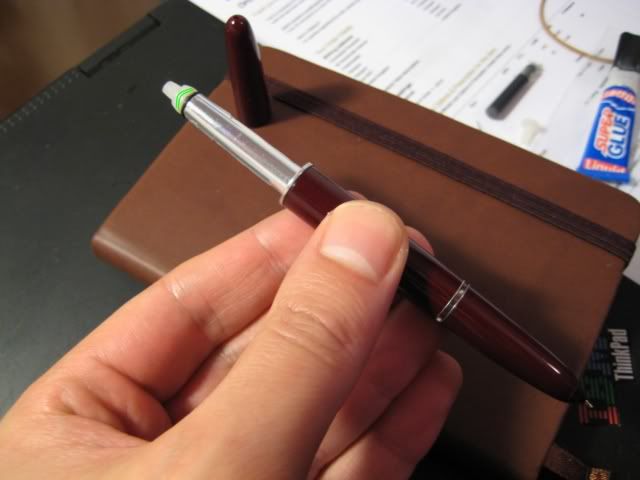
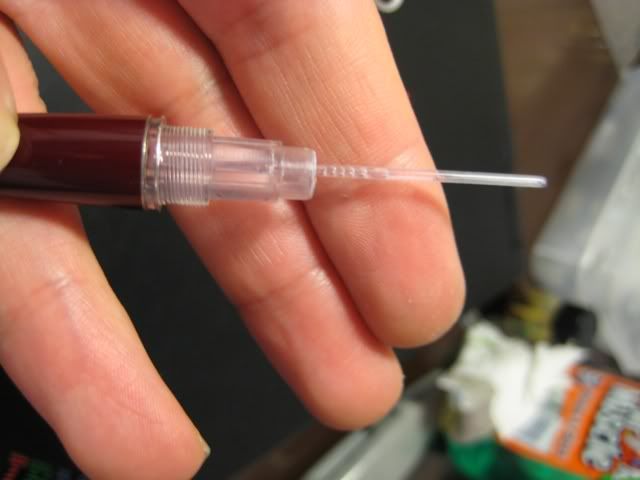
I removed the old ink sac after cutting a split down the side of it. I'm convinced some sort of glue was used to originally secure it, as heating the sac nipple had no loosening effect whatsoever. With the ink sac removed, you can see the 616's breather tube. It extends from the nib's feed at an angle, so most of its length sits close to one side of the sac rather than its centre. I kept this in mind for later on, so as to position the pressure bar in a way that minimised flexing the breather tube during operation of the filler.
The latex ink sac attached to the pen. I cut this sac the same length as the old silicon sac had been - about 5 centimetres. Then I shellaced the sac nipple and pushed the sac into place, and left it to dry.
If you've enjoyed reading this how-to as much I have writing it, stop by next time for the business end of this modification, converting the press bar assembly to a button fill assembly.
Hero 616 Button Filler - Cutting the Blind Cap
Cutting the blind cap (slicing the end off the barrel) is less perfunctory than it looks. Like most pens, the barrel on the 616 Jumbo is cigar shaped rather than cylindrical, with sloping, tapered sides.
I wanted to cut the blind cap as straight as possible, so it would fit back on the barrel without looking lopsided. In hindsight, it is not such a big deal if the initial separation isn't neat and straight, but more on that later. Without a mitre box, the best method I could think up to cut the blind cap was placing the whole pen in an upturned blank DVD cake...
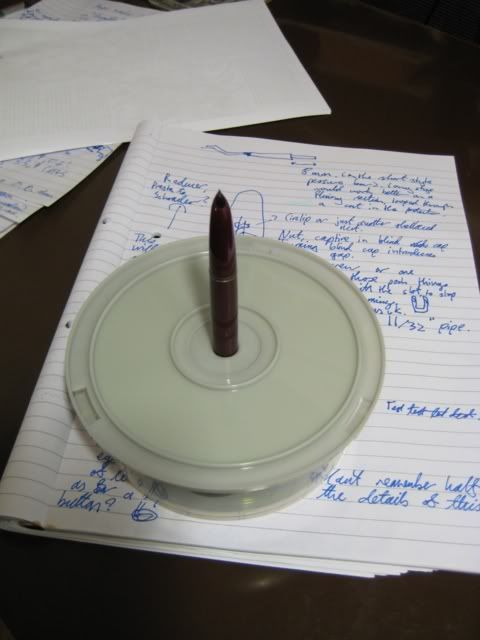
... and running a sharp blade around the circumference of the barrel, until a good guide groove was made.
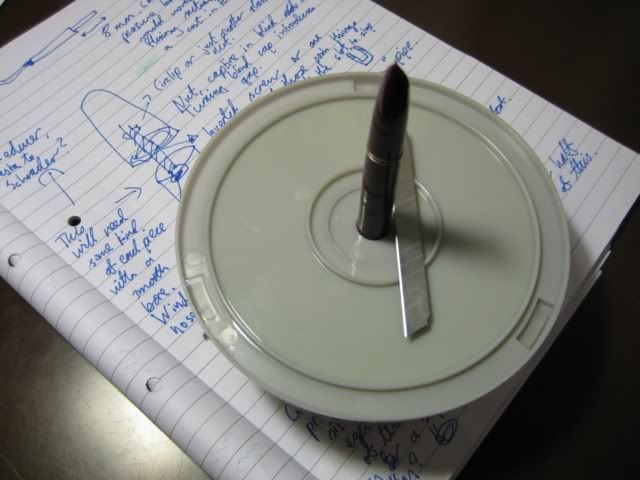
When the guide groove was nice and deep, the DVD cake was no longer needed. I just sawed around the groove with a sharp craft blade, using masking tape to minimise accidental nicks or scratches to the body.
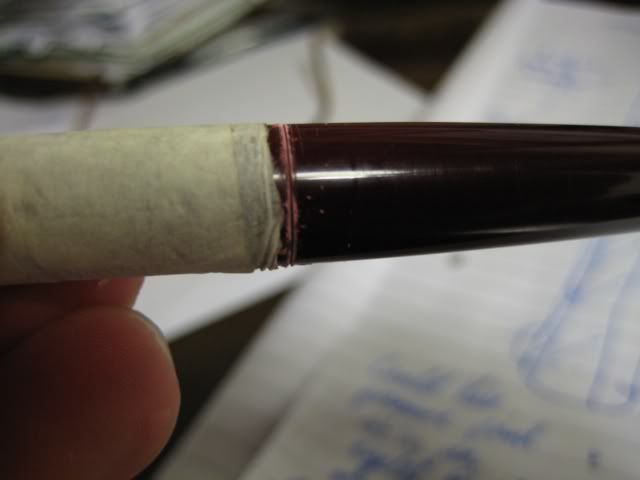
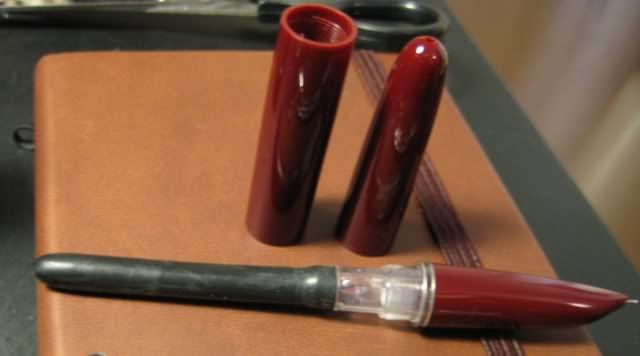
The separated blind cap and barrel. I'm not in the habit of sawing pens apart, and it came as a surprise to me that the barrel wall is far thicker at the top compared to the end the nib section screws onto.
A light rub against sandpaper smoothed out the cut areas. The unusually long blind cap was a consequence of using the deep DVD blank cake to cut it.
Up next, swapping out the silicon ink sac for a latex rubber ink sac.
I wanted to cut the blind cap as straight as possible, so it would fit back on the barrel without looking lopsided. In hindsight, it is not such a big deal if the initial separation isn't neat and straight, but more on that later. Without a mitre box, the best method I could think up to cut the blind cap was placing the whole pen in an upturned blank DVD cake...
... and running a sharp blade around the circumference of the barrel, until a good guide groove was made.
When the guide groove was nice and deep, the DVD cake was no longer needed. I just sawed around the groove with a sharp craft blade, using masking tape to minimise accidental nicks or scratches to the body.
The separated blind cap and barrel. I'm not in the habit of sawing pens apart, and it came as a surprise to me that the barrel wall is far thicker at the top compared to the end the nib section screws onto.
A light rub against sandpaper smoothed out the cut areas. The unusually long blind cap was a consequence of using the deep DVD blank cake to cut it.
Up next, swapping out the silicon ink sac for a latex rubber ink sac.
Monday 28 November 2011
Hero 616 Button Filler - Parts & Tools
Parts & Tools
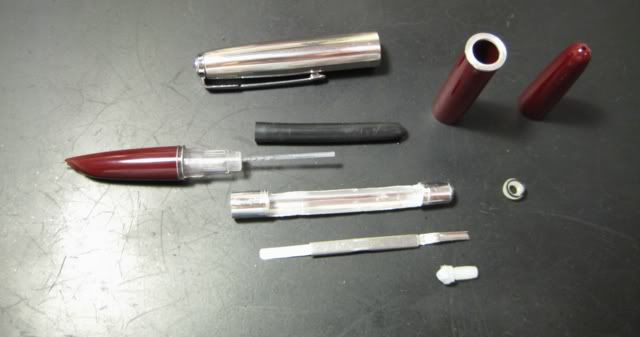
Kapow! Here's an exploded view of all the parts that the button filling 616 uses. Notice the absence of a press button - the blind cap (the barrel end piece on the extreme right) is the button here, and is not detached from the pen when it is time to refill the ink.
Parts Used (all prices include UK shipping)
Tools Used
I look forward to seeing you in the next post, "Cutting the Blind Cap".
Kapow! Here's an exploded view of all the parts that the button filling 616 uses. Notice the absence of a press button - the blind cap (the barrel end piece on the extreme right) is the button here, and is not detached from the pen when it is time to refill the ink.
Parts Used (all prices include UK shipping)
- A size 16 latex rubber ink sac - essential. This mod was almost scuppered trying, in my ignorance, to retain the factory fitted silicon sac, which is far too stiff for a pressure bar to compress. £1.56 from Cathedral Pens. I already had shellac to secure it and talc from Superdrug.
- A small (6.6cm) button filler pressure bar. £4.74 from eBay seller Chillipea, ask for one that matches the auction listing photograph.
- An M4 x 8 nylon nut and bolt. Twbfasteners on eBay sell a packet of 10 M4 nylon nuts, washers and bolts for £2.40.
- A pair of trim rings size 8mm inner and 12mm outer diameter. The only metal washers I could find that match this size were crush washers for car/bike hydraulics. I went for aluminium crush washers as they colour match the existing clutch rings better than copper. eBay shop Bargainbitz1 have packets of 10 for £1.25.
Tools Used
- An unbranded X-Acto style craft knife.
- A small pair of pliers.
- An unbranded mini drill, and the various cutting & sanding attachments they come with.
- A cake of blank DVDs, to hold the curved barrel straight as I cut the blind cap. I don't have a mitre box and had to improvise!
- Sandpaper, any grade will do really.
- A sharp, thin utility blade, I think it's the long Stanley type.
I look forward to seeing you in the next post, "Cutting the Blind Cap".
Sunday 27 November 2011
Hero 616 Button Filler Conversion - Introduction
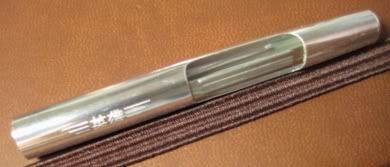
Boom! Straight from the off, here's a flattering photo of the finished article. It fills by unscrewing the blind cap by a few turns, which raises it away from the barrel. Then you immerse the nib in ink, and press down on the blind cap a few times. When finished, the blind cap is screwed back down flush with the barrel.
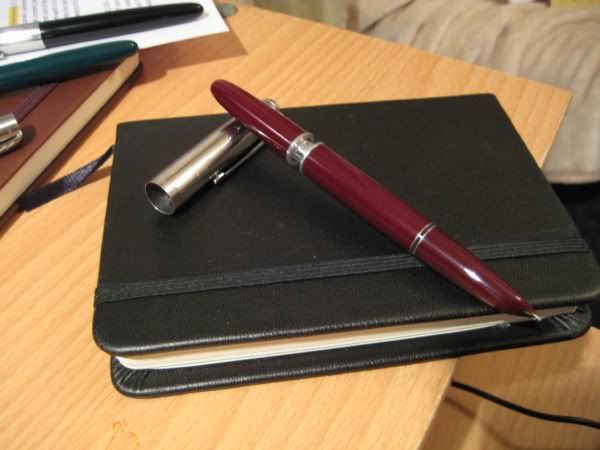
If you are interested in trying this for yourself, don't be put off by the dragging narrative in this introduction - skip straight past it. This was a very low budget modification that needed few parts and quite basic tools to carry out :-). I've split this guide into the following steps:
As much as I enjoy writing with the Hero 616 Jumbos, I'm part of the majority that don't particularly like the press bar assembly they use to fill the pens with ink. This involves removing the barrel, immersing the nib in an ink bottle, and squeezing the tiny bar on the sac guard. And squeezing the tiny bar on the sac guard. And squeezing the tiny bar on the sac guard...
Eventually the very tough semi-transparent silicon sac does fill up, but it's all a bit unsatisfying. Some FPNers just discard the sac guard - it pulls straight off - and press the ink sac with their fingers. Problem solved.
That was never going to be the end of the story! I wanted to try something a bit more involving. To quote Glinn, "If I didn't like messing with things and getting my fingers dirty, I would use a ball-point!". My interest in these pens started with Jim Mamoulides' article on modern Parker 51 clones. Understandably, none are vacuum fillers - it's too expensive and complex a system to replicate, especially at their price point. I would have to look further for inspiration...
 My imagination was fired by Ernst Bitterman's article on the Soviet refusal to allow a 51 gap, manufacturing crude yet effective accordion filling 'Soyuz' pens. This was closer to what I wanted to attempt - something that could emulate the vacumatic's functionality, using inexpensive parts and techniques available to the dilettante.
Then I remembered reading that as well as the press bar filling aeromatic and exotic vacumatic models, for a fleeting production run Parker made a button filling 51. I'd no experience with button fillers, but noticed to my surprise that the essential component - the pressure bar - is still being manufactured, and they are pretty cheap on eBay too. The 51 'red band' filler used a conventional ink sac and pressure bar arrangement. It also had a failure rate worthy of Microsoft's X-Box, which was both off putting and liberating - unconstrained by the original, I'd strike a new path, and if it tanked - well, I was keeping to the esprit de corps.
I'd found my muse, the die was cast, it was time to raise the sails and make best speed for the next post, parts and tools.
If you are interested in trying this for yourself, don't be put off by the dragging narrative in this introduction - skip straight past it. This was a very low budget modification that needed few parts and quite basic tools to carry out :-). I've split this guide into the following steps:
- This background introduction.
- A (very short!) list of parts needed and tools to use.
- Cutting the blind cap.
- Swapping the silicon ink sac for a latex ink sac.
- Transmogrifying the steel press-bar unit into a button filler unit.

As much as I enjoy writing with the Hero 616 Jumbos, I'm part of the majority that don't particularly like the press bar assembly they use to fill the pens with ink. This involves removing the barrel, immersing the nib in an ink bottle, and squeezing the tiny bar on the sac guard. And squeezing the tiny bar on the sac guard. And squeezing the tiny bar on the sac guard...
That was never going to be the end of the story! I wanted to try something a bit more involving. To quote Glinn, "If I didn't like messing with things and getting my fingers dirty, I would use a ball-point!". My interest in these pens started with Jim Mamoulides' article on modern Parker 51 clones. Understandably, none are vacuum fillers - it's too expensive and complex a system to replicate, especially at their price point. I would have to look further for inspiration...
My imagination was fired by Ernst Bitterman's article on the Soviet refusal to allow a 51 gap, manufacturing crude yet effective accordion filling 'Soyuz' pens. This was closer to what I wanted to attempt - something that could emulate the vacumatic's functionality, using inexpensive parts and techniques available to the dilettante.Then I remembered reading that as well as the press bar filling aeromatic and exotic vacumatic models, for a fleeting production run Parker made a button filling 51. I'd no experience with button fillers, but noticed to my surprise that the essential component - the pressure bar - is still being manufactured, and they are pretty cheap on eBay too. The 51 'red band' filler used a conventional ink sac and pressure bar arrangement. It also had a failure rate worthy of Microsoft's X-Box, which was both off putting and liberating - unconstrained by the original, I'd strike a new path, and if it tanked - well, I was keeping to the esprit de corps.
I'd found my muse, the die was cast, it was time to raise the sails and make best speed for the next post, parts and tools.
Hero 616 Cap Fix
The following was originally posted on FPN in July, as indicated by the outdoor scotch & soda, bright, grain free photos and lack of blind cap rings on the burgundy 616 Jumbo.
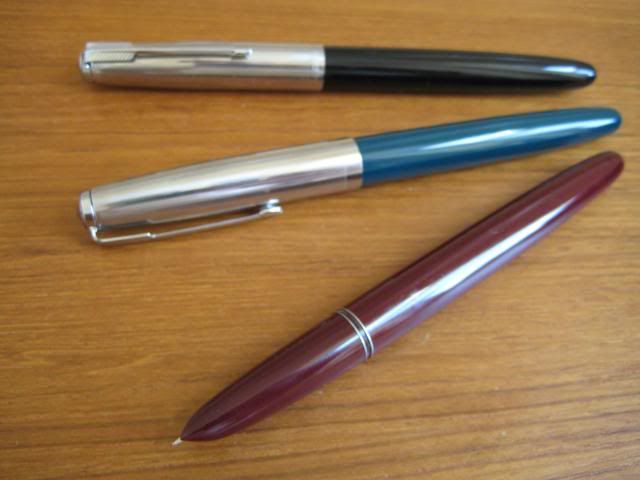
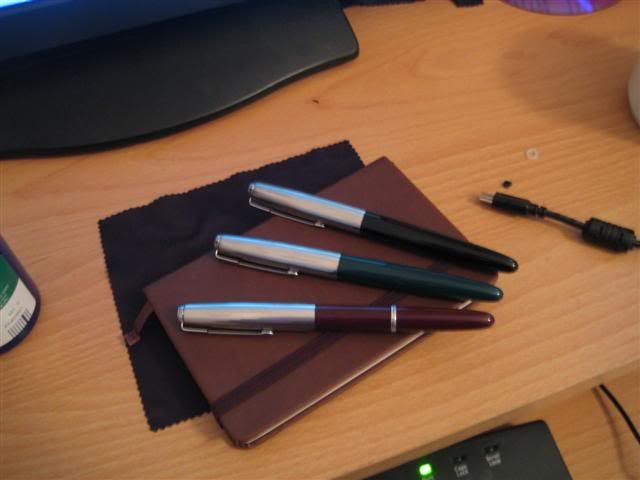
The recent spate of excellent and informative posts on the Hero 616 prompted me to buy a 3 pack of the 'jumbo' size pens from eBay seller Yespen, in black, burgundy, and bluey-green. After the much appreciated efforts of members here, I'd like to contribute with a "tweak the cap to fit properly" photo set. I've tried to make this less long winded than my usual sagas.
Of the 3 pens I bought, only the green 616 had a cap that functioned the way I expected it to when capping onto the body, the cap clutch locking positively between the metal rings on the body of the pen. The black and burgundy pens had caps that just jam onto the pen without the clutch fingers reaching the rings. After reading reviews by Nihontochicken and Dillo, I realised that quite a few of these pens must have problem caps. It's a case of excellent design and variable execution.
The really good news is that the problem is easily fixed - nothing to do with the clutch fingers in the cap, or the rings on the body of the pen. The culprit is the plastic inner cap, made to poor tolerances. On my black and burgundy pens, the lip of the inner cap needed to be honed out a little, to allow the pen to go further into the outer cap, allowing the steel clutch fingers to do their job and reach the metal rings on the pen body.
Below, my 616's, ready for tweaking. You can see the metal rings on the burgundy one...
... and the 5 clutch fingers inside the cap:

Diagnosis
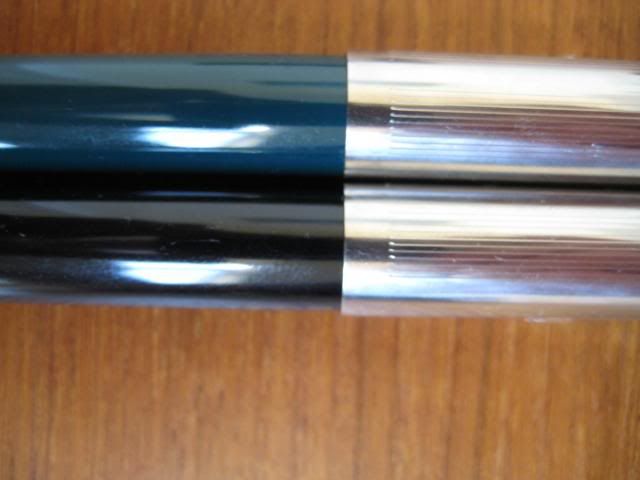
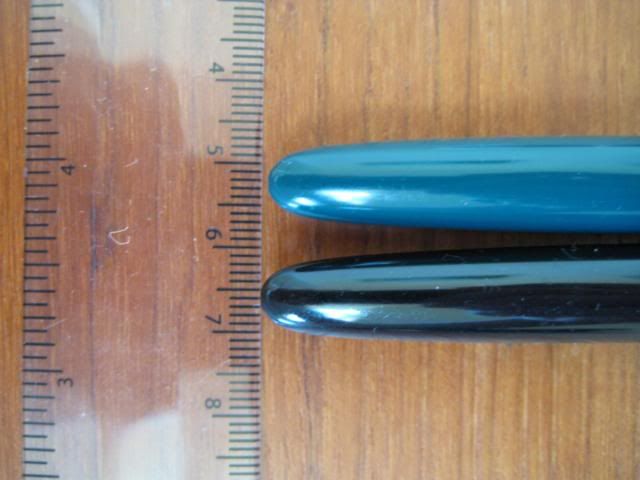
I could see and feel the difference between the good green pen's cap and the bad black and burgundy's caps. Capping the green pen is a smooth action, with progressively more tension, until the clutch fingers snick-snap into the recess between the metal rings of the pen body. In the two photos below, you can see that with the green pen and the burgundy side by side, the green pen extends further into the cap.
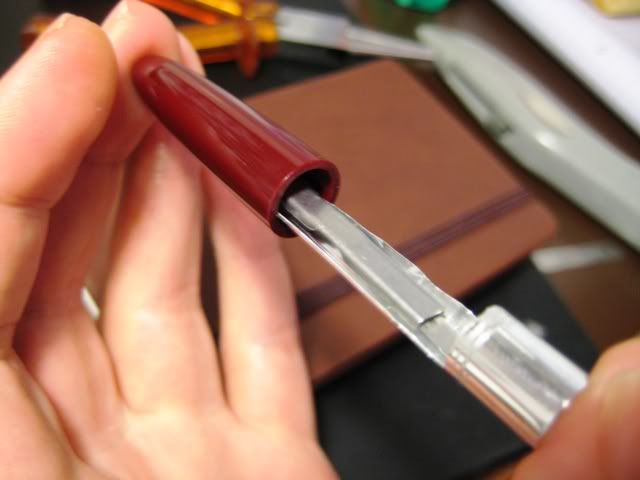
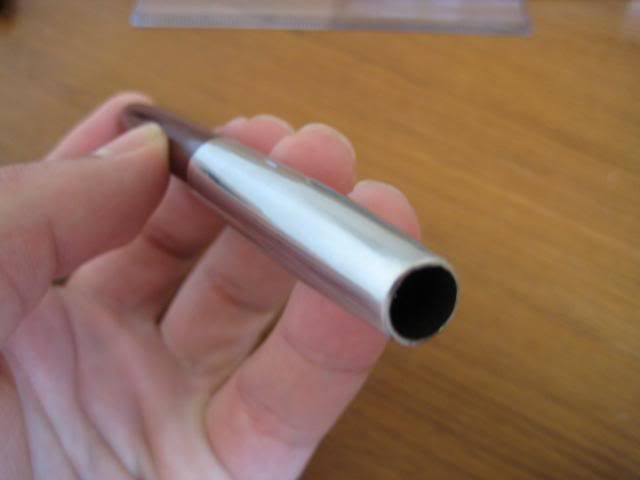
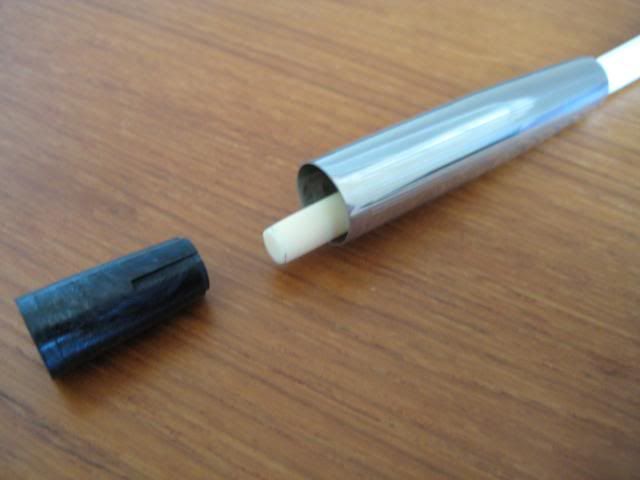
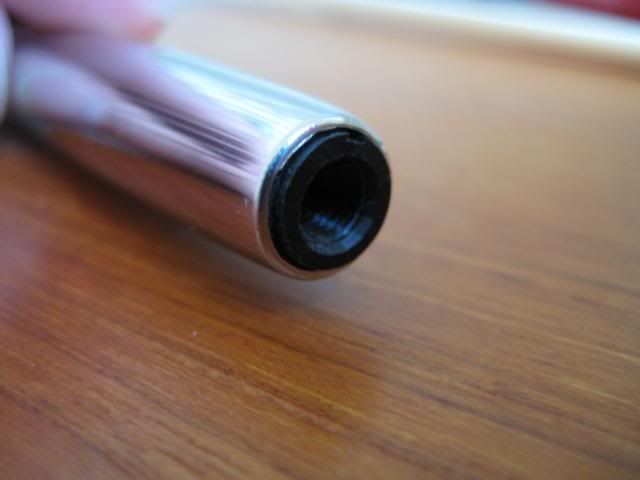
If all your Heros have caps that just jam on, you can get a feel for how they ought to behave by removing the inner cap from the outer cap, and putting the empty outer cap on the pen. You can then feel the clutch fingers snick into the metal ring area on the barrel. In this way, you can also gauge how far down the pen body the cap should travel after this fix. Here's a photo of the cap on the burgundy 616, sans inner cap, clip, and jewel.
Disassembling The Cap
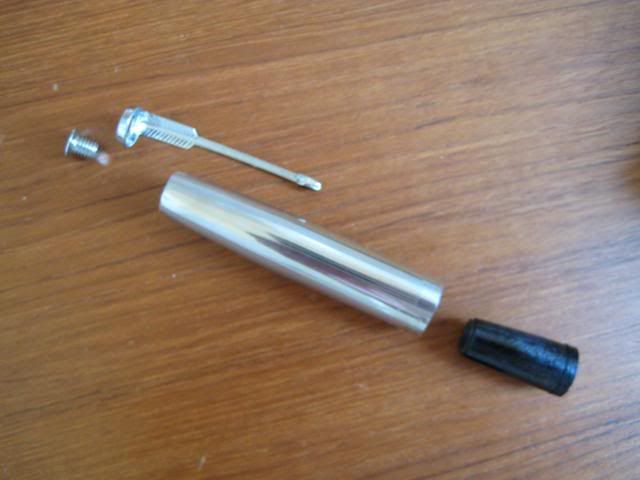
Thanks to the guide provided by Yespen, and brought to my attention by acoobradovic, taking the cap apart is a doddle. Pop a flathead screwdriver up inside the cap, hold the clip in place so it doesn't rotate, and unscrew - a 5 or 6mm head seemed to be best, see photo below.

Also, most screwdriver heads seem to flair in a way that prevents them going all the way into this inner cap, and most of those change-the-bit types are too thick as well. In the next pic, only the red screwdriver reached the slot in the inner cap.
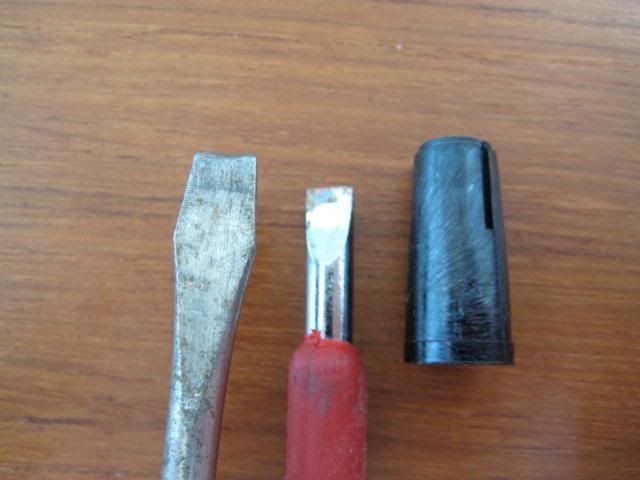
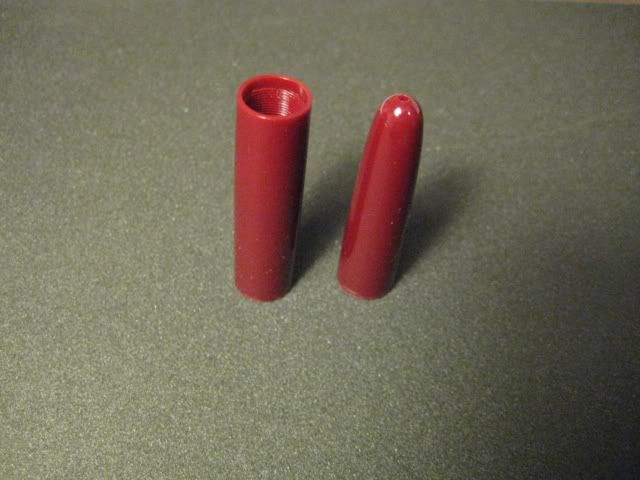
The cap in pieces. Jewel, clip, body, inner cap.
If the inner cap doesn't want to leave, poke it out the bottom with a chopstick or similar.
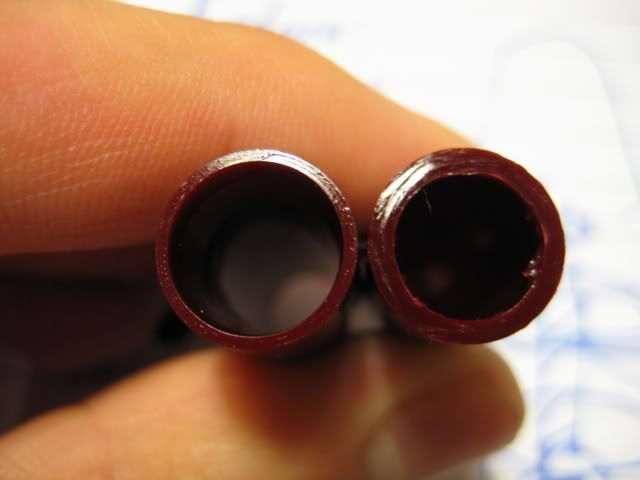
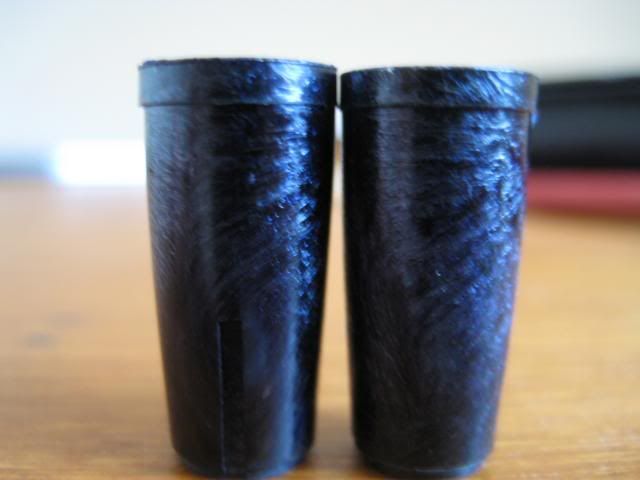
I took a few close up shots, comparing the "bad" inner cap of the burgundy 616 - on the left - and the "good" inner cap of the bluey-green 616 (on the right).
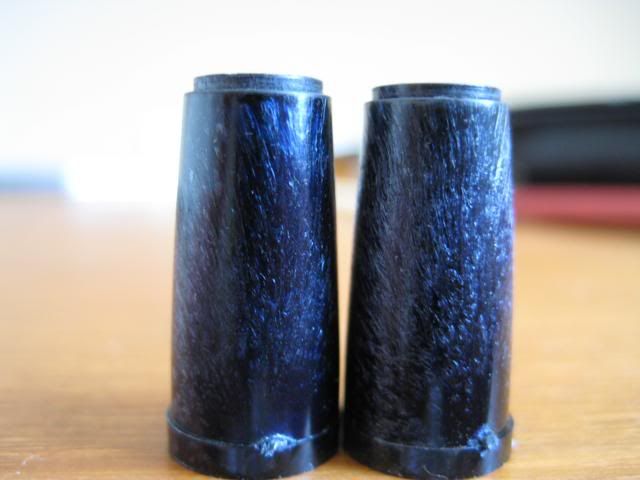
The outer dimensions of the burgundy's inner cap seem larger.
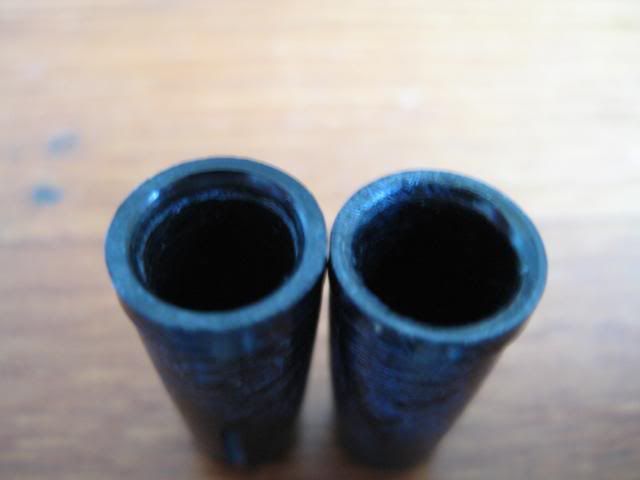
The internal lip seems less spacious too.
Tweaking the inner cap
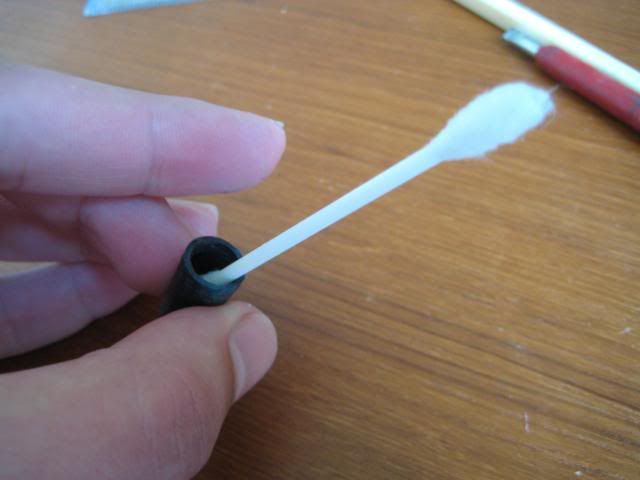
To hone out the inner cap's cavity lip a little, I used a mini drill and various head attachments [edit - it wasn't any of these attachments, they're too big!]. The burgundy's inner cap needed honing a lot more than the black pen's.
As a rough test of whether enough has been ground out, pop the inner cap into the outer cap, and slide it onto the pen to see whether the cap fingers can reach the barrel rings - no need to screw everything back together each time you check.
Cleaning out the swarf (it is soft plastic and very easy to smooth):
After all that, time to enjoy the summer sun with your freshly tweaked 616's and a relaxing whisky & soda.
A suivre - converting the much maligned press bar filler to a button filler.
The recent spate of excellent and informative posts on the Hero 616 prompted me to buy a 3 pack of the 'jumbo' size pens from eBay seller Yespen, in black, burgundy, and bluey-green. After the much appreciated efforts of members here, I'd like to contribute with a "tweak the cap to fit properly" photo set. I've tried to make this less long winded than my usual sagas.
Of the 3 pens I bought, only the green 616 had a cap that functioned the way I expected it to when capping onto the body, the cap clutch locking positively between the metal rings on the body of the pen. The black and burgundy pens had caps that just jam onto the pen without the clutch fingers reaching the rings. After reading reviews by Nihontochicken and Dillo, I realised that quite a few of these pens must have problem caps. It's a case of excellent design and variable execution.
The really good news is that the problem is easily fixed - nothing to do with the clutch fingers in the cap, or the rings on the body of the pen. The culprit is the plastic inner cap, made to poor tolerances. On my black and burgundy pens, the lip of the inner cap needed to be honed out a little, to allow the pen to go further into the outer cap, allowing the steel clutch fingers to do their job and reach the metal rings on the pen body.
Below, my 616's, ready for tweaking. You can see the metal rings on the burgundy one...
... and the 5 clutch fingers inside the cap:
Diagnosis
I could see and feel the difference between the good green pen's cap and the bad black and burgundy's caps. Capping the green pen is a smooth action, with progressively more tension, until the clutch fingers snick-snap into the recess between the metal rings of the pen body. In the two photos below, you can see that with the green pen and the burgundy side by side, the green pen extends further into the cap.
If all your Heros have caps that just jam on, you can get a feel for how they ought to behave by removing the inner cap from the outer cap, and putting the empty outer cap on the pen. You can then feel the clutch fingers snick into the metal ring area on the barrel. In this way, you can also gauge how far down the pen body the cap should travel after this fix. Here's a photo of the cap on the burgundy 616, sans inner cap, clip, and jewel.
Disassembling The Cap
Thanks to the guide provided by Yespen, and brought to my attention by acoobradovic, taking the cap apart is a doddle. Pop a flathead screwdriver up inside the cap, hold the clip in place so it doesn't rotate, and unscrew - a 5 or 6mm head seemed to be best, see photo below.
Also, most screwdriver heads seem to flair in a way that prevents them going all the way into this inner cap, and most of those change-the-bit types are too thick as well. In the next pic, only the red screwdriver reached the slot in the inner cap.
The cap in pieces. Jewel, clip, body, inner cap.
If the inner cap doesn't want to leave, poke it out the bottom with a chopstick or similar.
I took a few close up shots, comparing the "bad" inner cap of the burgundy 616 - on the left - and the "good" inner cap of the bluey-green 616 (on the right).
The outer dimensions of the burgundy's inner cap seem larger.
The internal lip seems less spacious too.
Tweaking the inner cap
To hone out the inner cap's cavity lip a little, I used a mini drill and various head attachments [edit - it wasn't any of these attachments, they're too big!]. The burgundy's inner cap needed honing a lot more than the black pen's.
As a rough test of whether enough has been ground out, pop the inner cap into the outer cap, and slide it onto the pen to see whether the cap fingers can reach the barrel rings - no need to screw everything back together each time you check.
Cleaning out the swarf (it is soft plastic and very easy to smooth):
After all that, time to enjoy the summer sun with your freshly tweaked 616's and a relaxing whisky & soda.
A suivre - converting the much maligned press bar filler to a button filler.
Hero 616 Fountain Pens, a Troika of Mindthots.
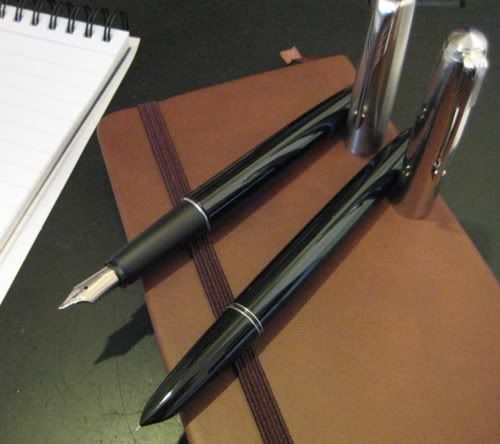
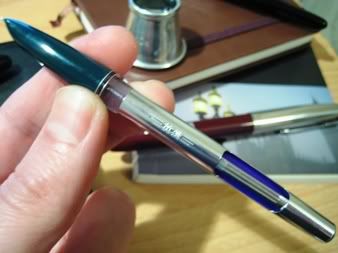
The Hero 616 is a modern day copy of the famous Parker 51 aeromatic. In the flesh, the jumbo size (on the right in this photo) is slightly thinner and longer than the Parker Frontier:
Although I have a few vintage pens, I'm content with what I have, and haven't considered getting a genuine 51 so far. This is mostly because of the going rate for these very popular vintage pens, but also because of cosmetic factors - the caps on most eBay examples seem to have taken a real battering compared to other pens of similar age.
Also, part of my fascination for old fountain pens lies in fixing up their archaic, thoughtfully engineered insides. 51's have a reputation for either just working (the indefatigable, but less than quixotic aeromatic bladder filler) or requiring prohibitively expensive specialist tools to restore (the ingenious "seen the diagrams, still not sure why that works" vacumatic).
So why buy a 616? By many measures - the robust cap design, the way they write, the neatly integrated ink level window, the sleek look - they're excellent value for money. I've had this 3-pack (just £8.33 shipped) of 616 Jumbos for about 4 months now.
As they cost so little, quality control can be a little lax. A few tweaks here and there can make these pens work as well as they were meant to. A few more tweaks, even better than they were meant to! For the next few posts, I'll be focussing on the Hero 616:
- Showing how to make problem caps clip onto their clutch rings properly (already on FPN, & included here for completeness)
- Converting the oft criticised standard press bar filler to a blind cap button filler
- Something else I haven't decided on, but writing this might commit me to thinking it up. Maybe a cartridge filler, or 61-style capillary filler? [EDIT: I have now thought it up.]
Wednesday 26 October 2011
(4) Reassembly
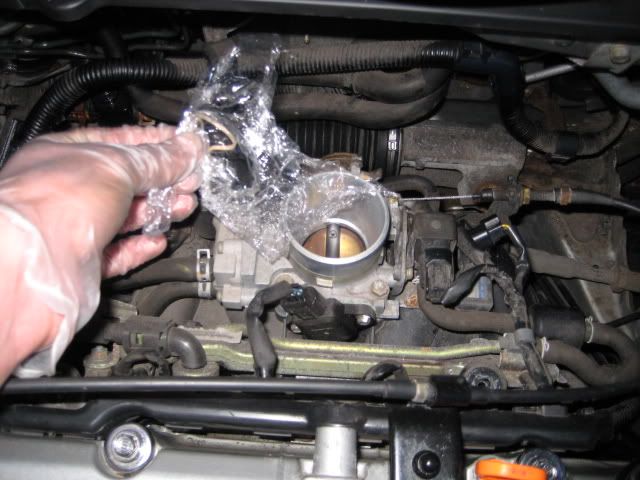
Reassembly is the reverse of disassembly. Is there a more disingenuous term? Who wants to read every sentence backwards, just as they're flagging? To put everything back together, I started by taking the clingfilm off the throttle body.
In the space of 10 minutes, it was getting hard to see. Sunset is getting much earlier this time of the year :-(
Refitting the Air Box
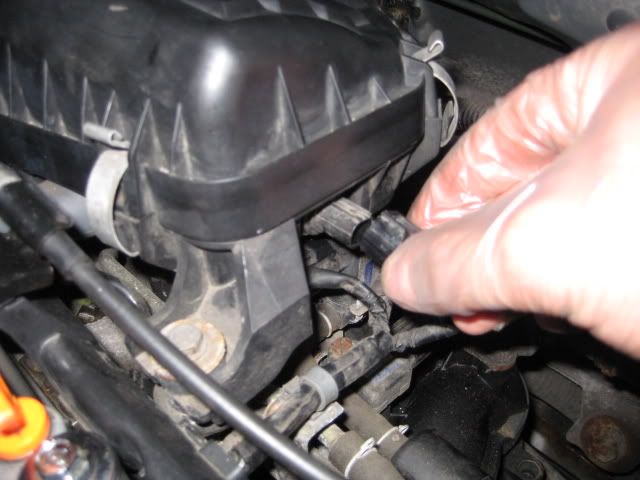
With the airbox pushed back onto the throttle body, I popped the breather hose back on and tightened the two 10mm bolts (these don't need a lot of tightening).
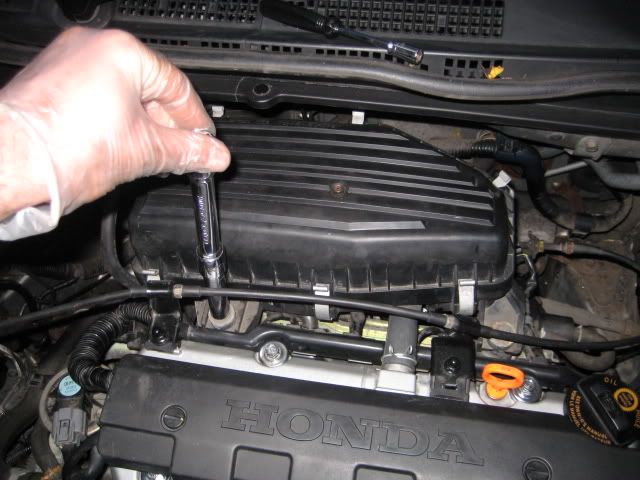
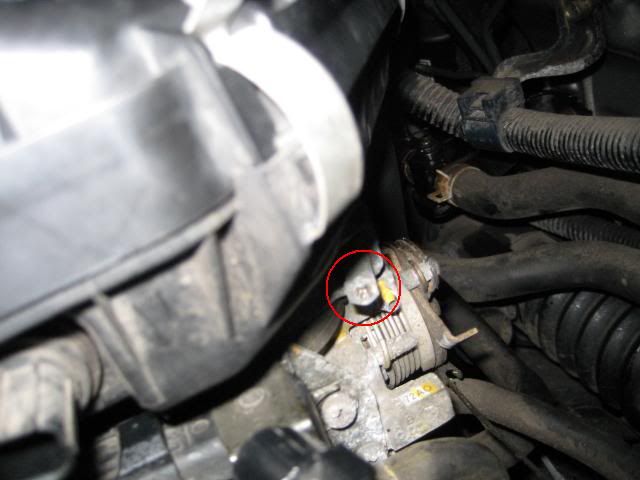
Almost forgot to tighten that little 8mm jubilee clip screw/bolt back up:
Plugging the electrical connector back in, the airbox refitting is completed.
Refitting the Resonator
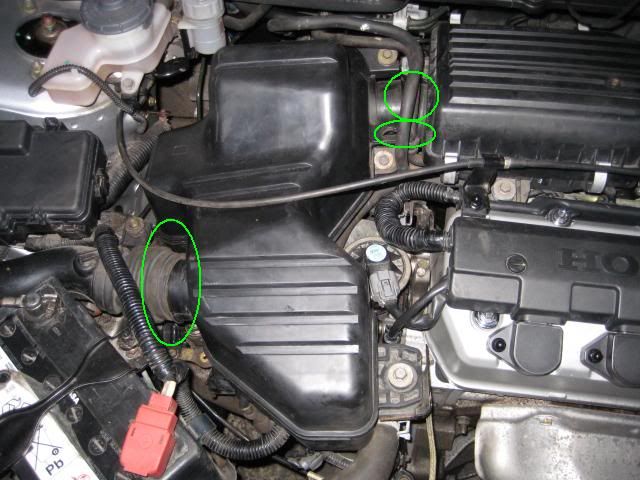
Last step! Slot the right hand side of the resonator back into the airbox union, and push the pipe below it into its clip on the the resonator. Then slot the fat intake tube into the resonator's left side.
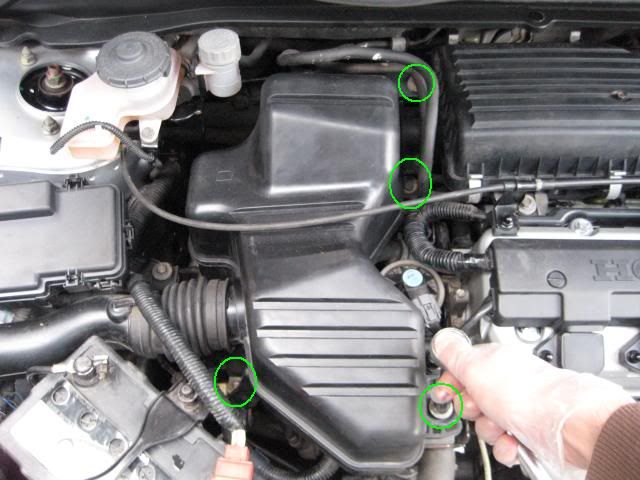
Refit the four 10mm bolts:
...and the job is done. Hopefully, all this has prolonged the life of my EPS rack. Given the lack of grease at 63,000 miles, I think that lubricating the slider guide's area of travel ought to be part of the service schedule for these Civics.
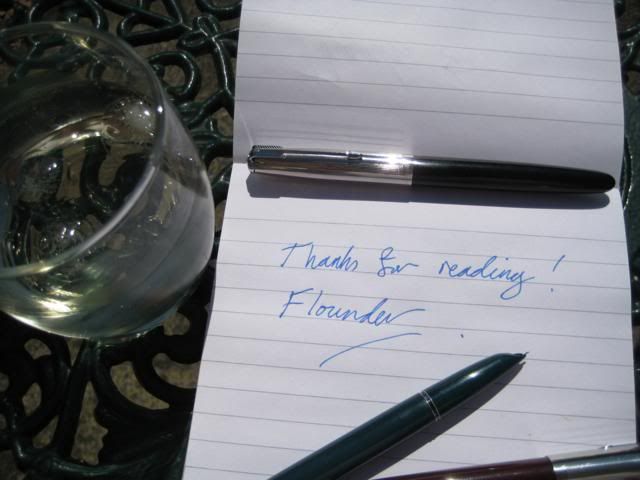
Thanks for reading!
Flounder
In the space of 10 minutes, it was getting hard to see. Sunset is getting much earlier this time of the year :-(
Refitting the Air Box
With the airbox pushed back onto the throttle body, I popped the breather hose back on and tightened the two 10mm bolts (these don't need a lot of tightening).
Almost forgot to tighten that little 8mm jubilee clip screw/bolt back up:
Plugging the electrical connector back in, the airbox refitting is completed.
Refitting the Resonator
Last step! Slot the right hand side of the resonator back into the airbox union, and push the pipe below it into its clip on the the resonator. Then slot the fat intake tube into the resonator's left side.
Refit the four 10mm bolts:
...and the job is done. Hopefully, all this has prolonged the life of my EPS rack. Given the lack of grease at 63,000 miles, I think that lubricating the slider guide's area of travel ought to be part of the service schedule for these Civics.
Thanks for reading!
Flounder
Subscribe to:
Posts (Atom)