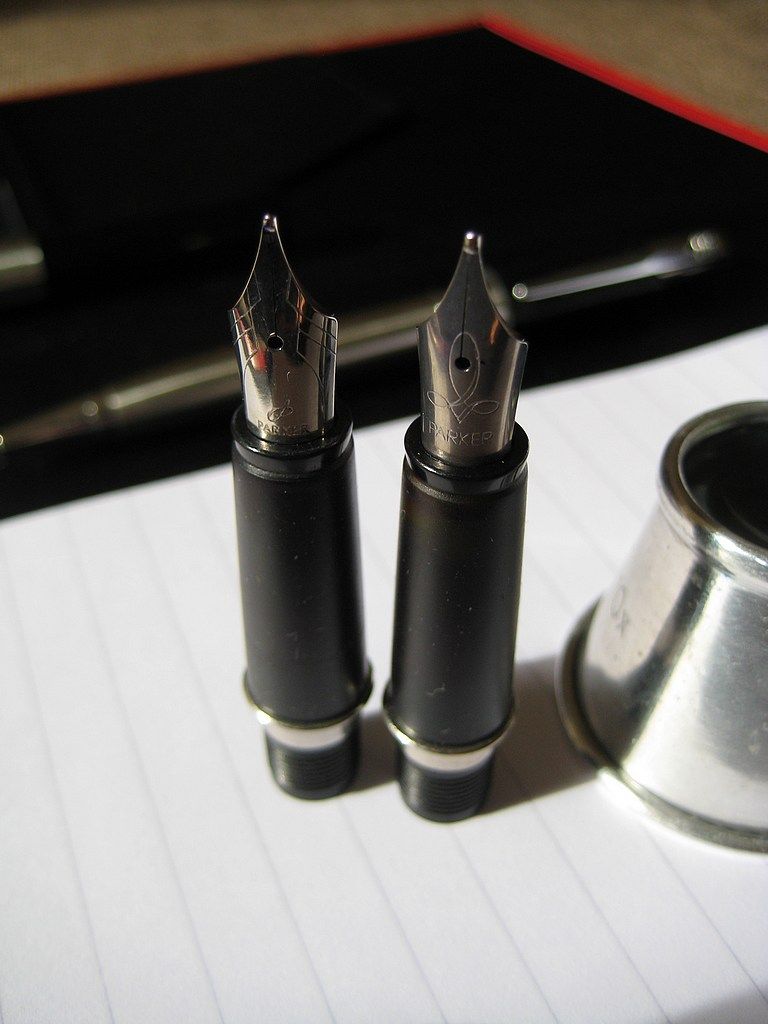
Left to right: blocked M nib Frontier section, clear B nib Frontier section.
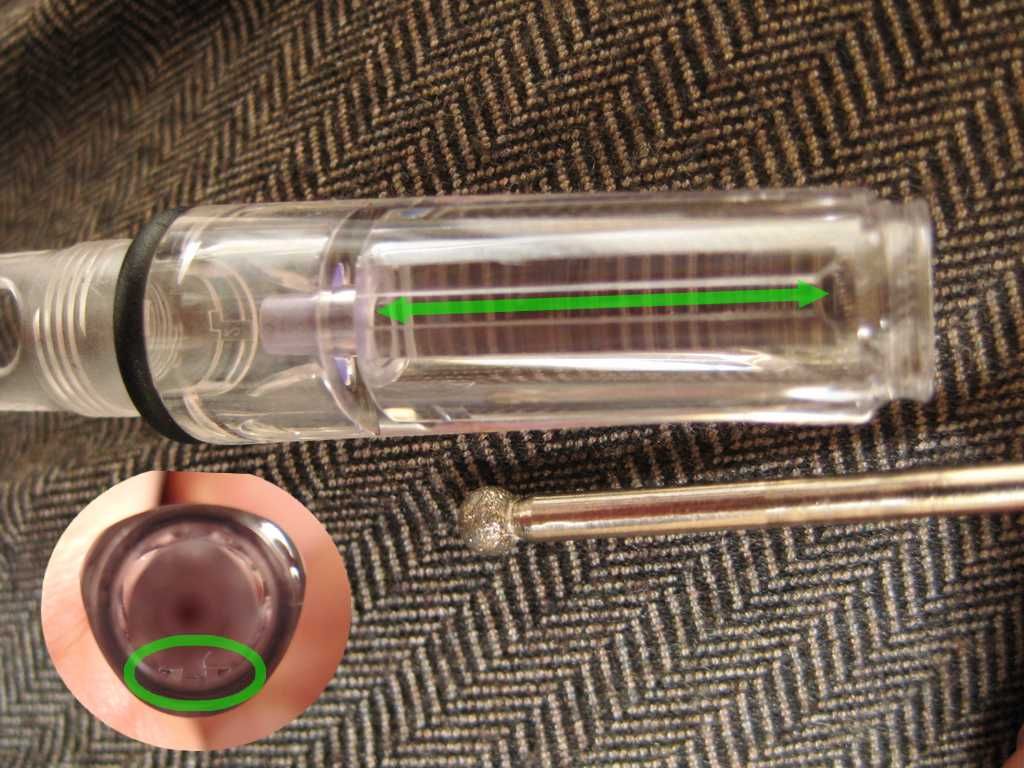
So little goes wrong with cartridge pens that I was a little thrown when my medium-tip nibbed Parker Frontier started playing up. Despite giving the nib and feed a good clean, flow had become erratic, sometimes okay, and sometimes very miserly, even with a fresh cart installed. I hope this post makes for useful reading if you have a similar problem.
The Frontier is normally a real workhourse, supremely reliable. Parker cartridges are also some of the best there are, with channels thoughtfully molded in the interior to help prevent surface tension from spoiling the flow.
Internal channels in a Parker ink cartridge.
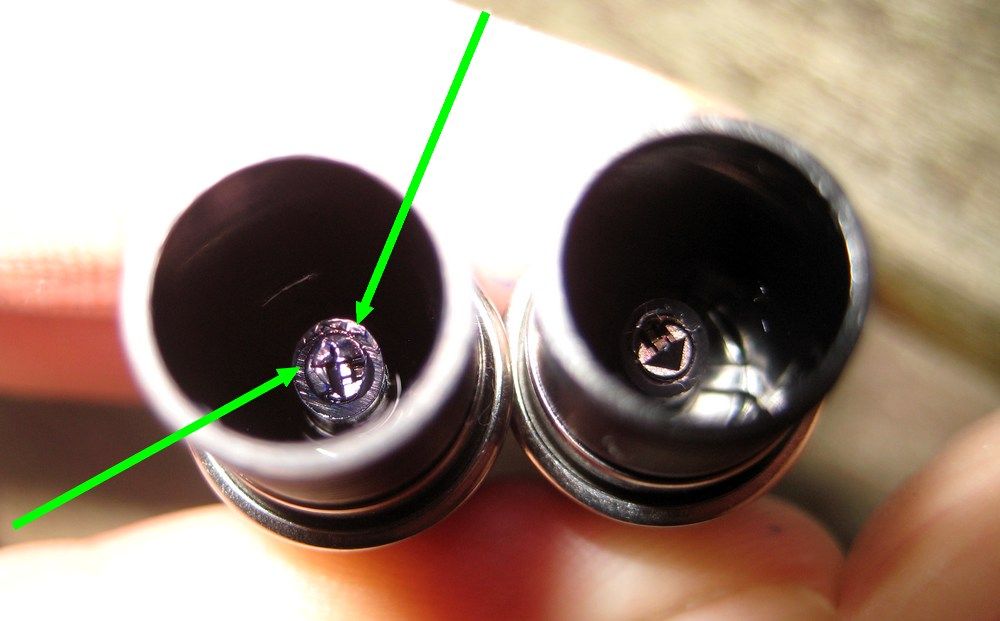
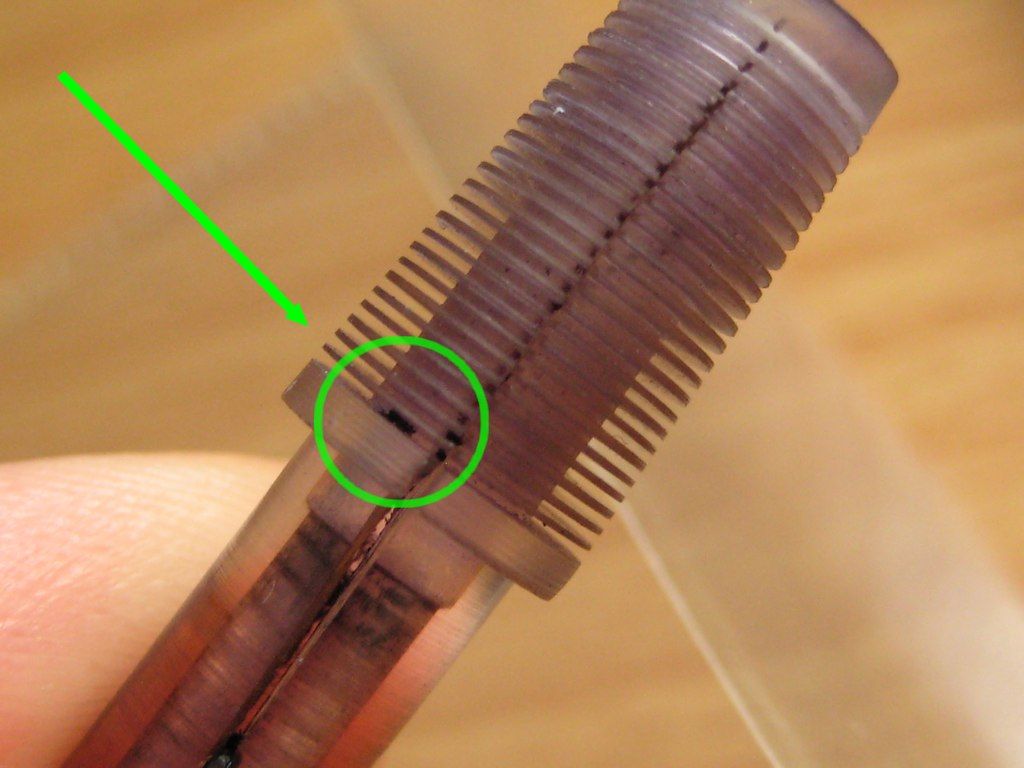
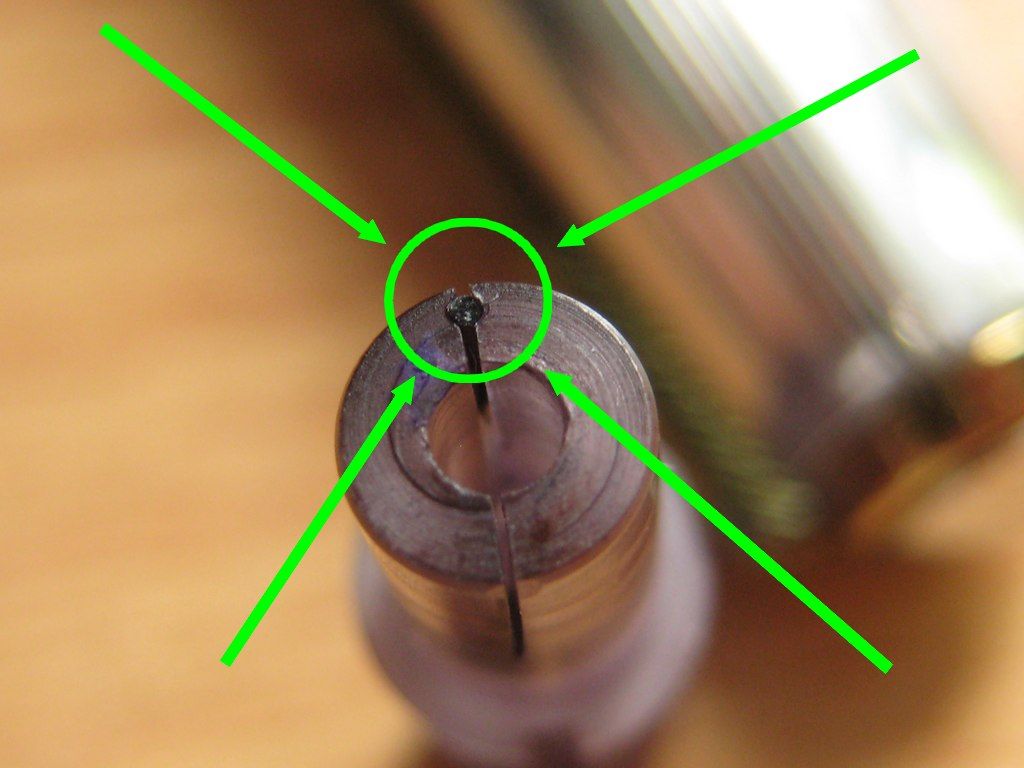
Anyhoo, comparing the two sections, I finally spotted the cause of the flow issue. There's some kind of something partially blocking the cartridge nipple, highlighted below.
Without a bright light and another section to compare it to, I'd probably have overlooked this blockage!
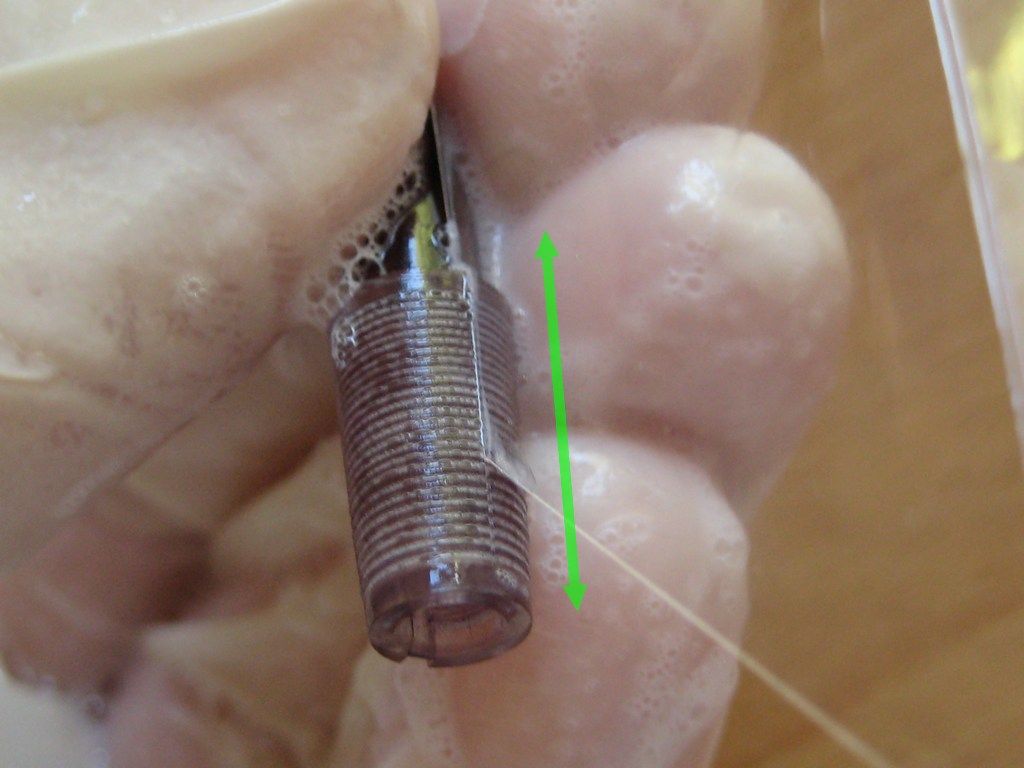
As Parker adopted a fab screw-in nib & feed design for the Frontier, clearing out the cart nipple was a doddle. In homage to and in appreciation of Hamish McNagg's great YouTube clips (kindly hosted on Stephen Brown's channel), I've uploaded a wee vid illustrating this, embedded below. Hi from Glasgow, Hamish!
Say what you will of grainy, bulky, obsolete old VHS tapes. Shiny DVDs and Blu-Rays cut no ice when it comes to the humane capture and release of gross bugs. For anything creepy, hairy, dusty and leggy, stick to analogue, that's my advice.
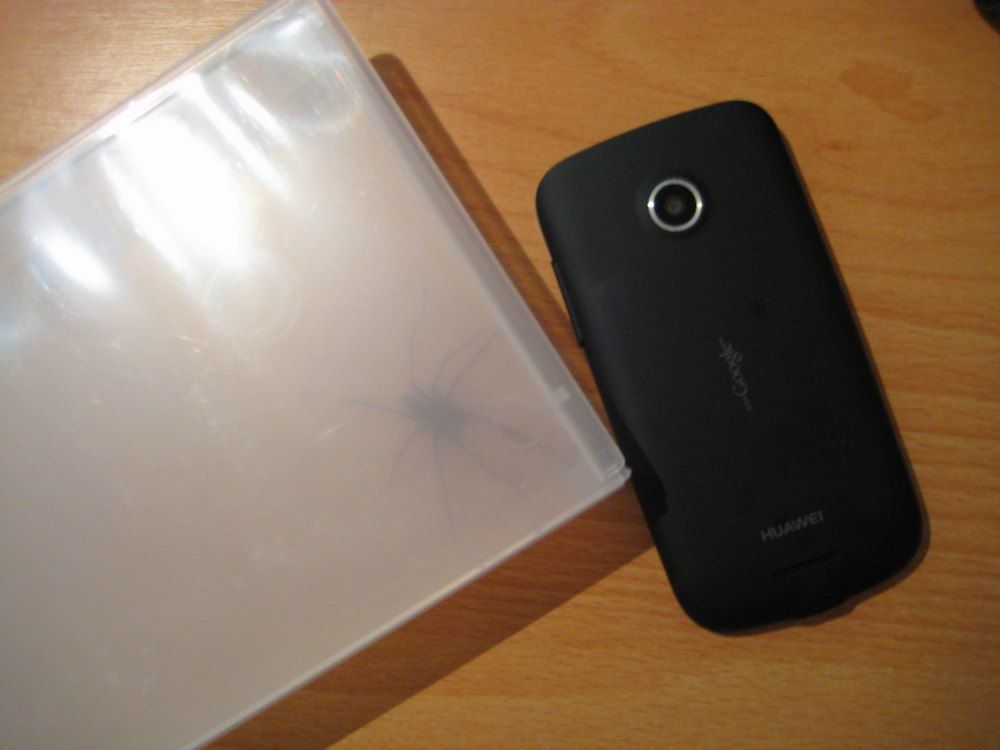
As big, and almost as thick, as a phone.
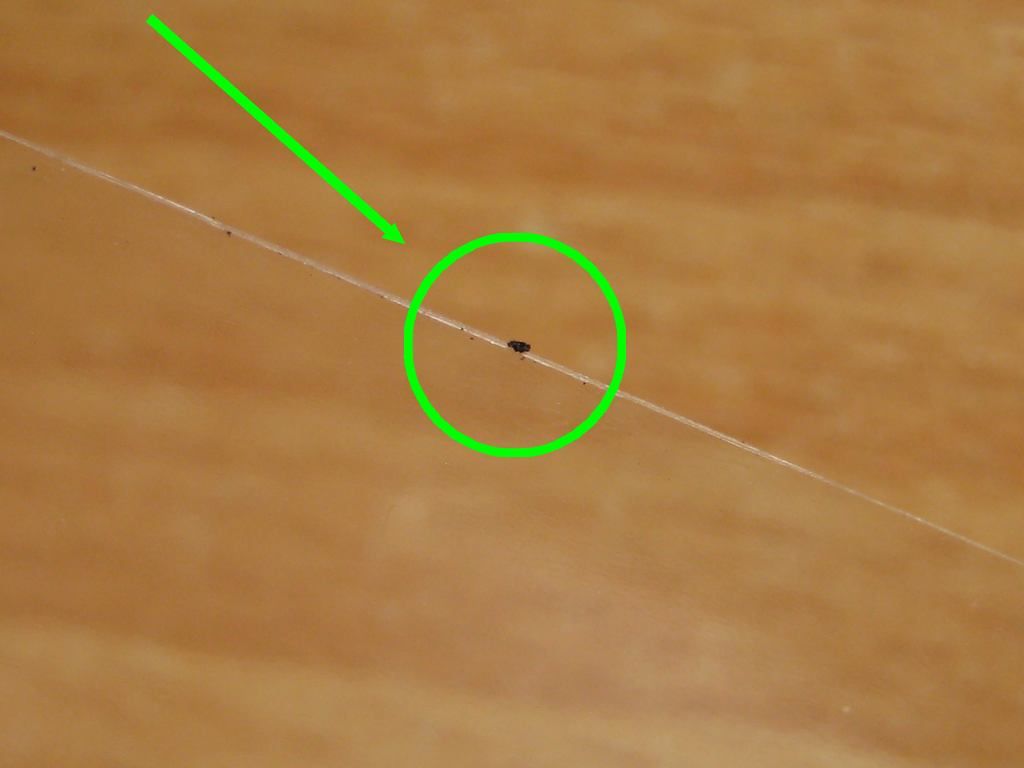
I'm not sure of the exact genus this speedy chap hails from, perhaps "Facehugger" is as good a categorisation as any.
I don't want to cause undue anxiety, so if you're reading this on a smartphone, I won't mention the slim possibility that one of his brethren is clinging behind your screen, about to scuttle up your sleeve this very moment, compound eyes glistening and mandibles chomping at the thought of your juicy ripe flesh.
Aside from perfect size, shape, weight, balance, strength and affordability, one of the things I really appreciate about the seminal Parker 51 is the enormous ink regulating collector within the section. It's a large part of what makes writing with the 51 such a sublime experience.
Disassembling the hood and cleaning out the collector is something I generally do only once per pen, on first receipt of each 51. After that, I periodically clean them out by flushing through with clean water, occasionally filling with water and leaving aside for a week while out of rotation. With standard Diamine ink, that's all they've needed - I'm not into super saturated inks or archival iron galls.
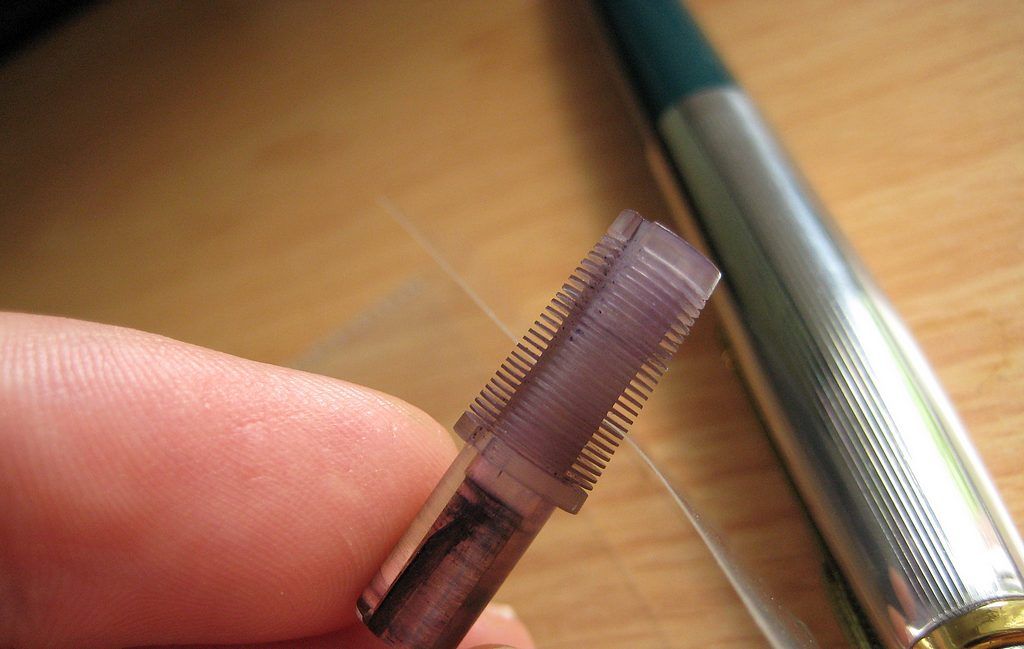
The collector is full of thin fins, and even after flushing, half a century of old ink can leave debris trapped between them. To floss without fear of damaging the fins - which are far less delicate than they look - I like to use a humble plastic CD/DVD envelope.
The flap of this CD envelope easily slots between the Parker 51's collector fins.
Why
These envelopes are:
Thin enough to fit between the collector fins easily.
Very flexible - it's almost impossible to damage the collector through clumsiness.
Inexpensive and ubiquitous.
Lint free - there's nothing to shed off the plastic envelope and potentially clog the fins.
Transparent - you can see exactly what you're doing.
How
Holding the collector off the desk so that there's plenty of light around the fins, I use the open flap of the envelope to floss out any dried up detritus. Occassionally, there are deposits that prove reluctant to be flossed. These can be walked around to the broad air channel, then flicked out using the same flap.
In the example collector below, the majority of the fins are clean and clear. The arrowed fins have some kind of gunk trapped between them right at the root, near the thin ink channel. The CD envelope flap in the background will get rid of it in a few seconds without stressing the fins.
Out, damned spot! Out , I say!
Zap! A pass of the flap between the fins' gap picks up the crap before you can, er... doff your cap.
The outed spot.
The CD envelope is also thin enough to help clean out the collector's thin ink channel itself.
Cleaning out a P51 collector's ink channel using a CD envelope and fragrance free, pH neutral soap.
Before reassembly, I like to double check the shim is still in place, if cleaning an early style collector.
A shimmed early collector. The shim shown is a substitute for the missing original, which tend to be a bit longer.
Something I've learned to accept about myself is that I have no interest at all in treadmills and cycling machines and the like. For cardiovascular exercise, I prefer a long walk outdoors.
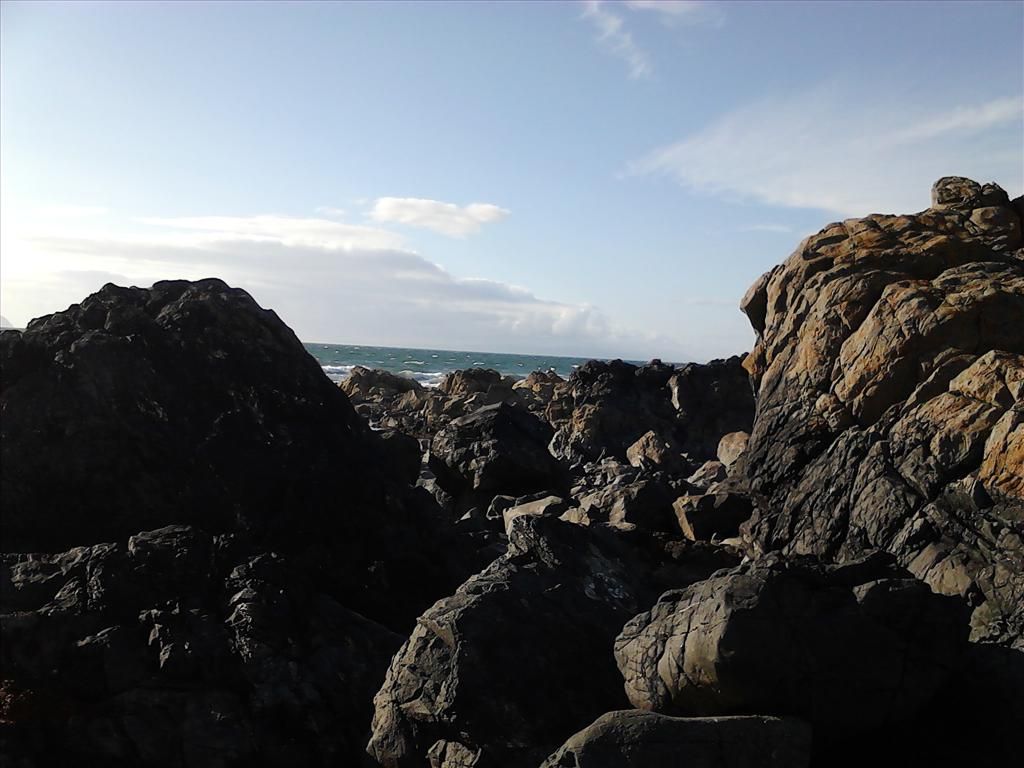
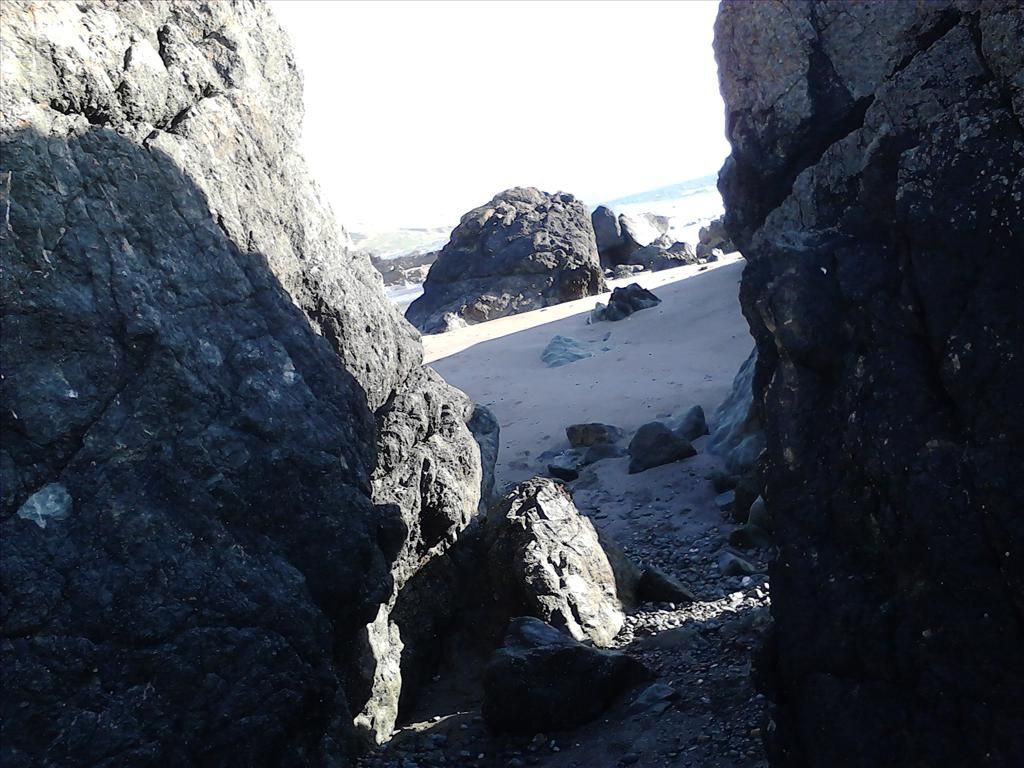
Even better is a clamber along the Ayrshire coast, which offers a lively sea spray and the kind of magnificent, boulder strewn desolation that puts you in mind of Plesiosaurs, continental shifts, and the unsettling antiquity of the Earth.
Yeah, everybody's gone surfin'
... before being dashed to pieces.
This still qualifies as a 'sea view', right?
Quite a calm sea meant these smaller rocks were dry and unslippery.
I'm surprised by how well the phone coped with this light. The sun was very low, dazzling me on the left as I took this shot.
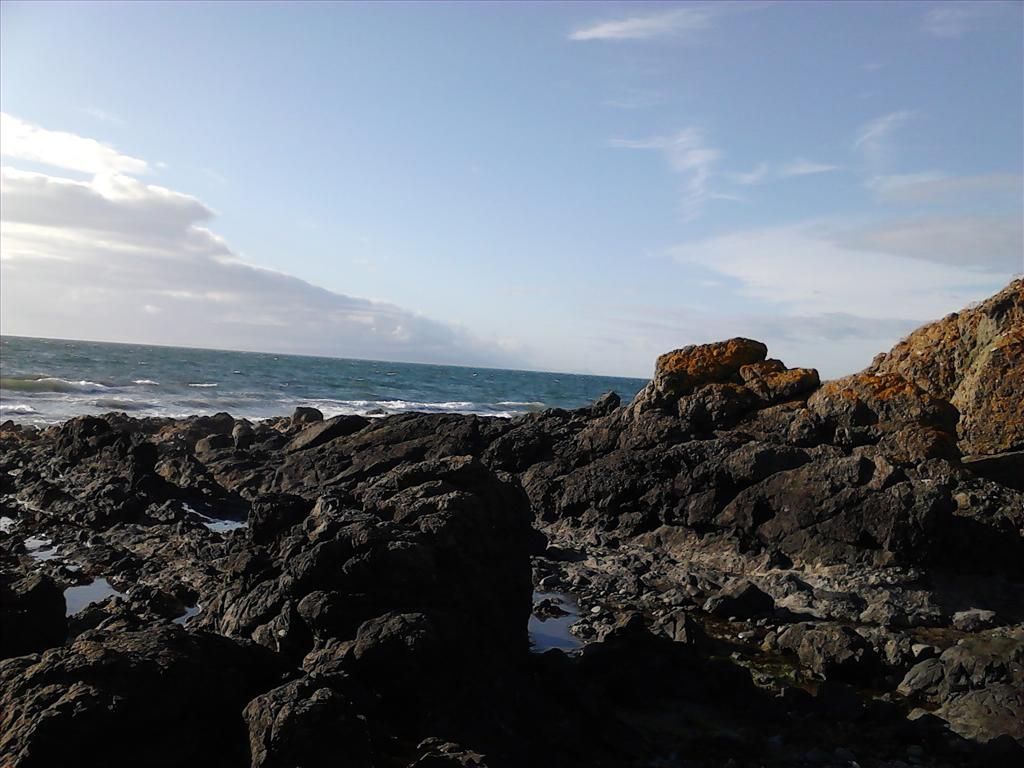
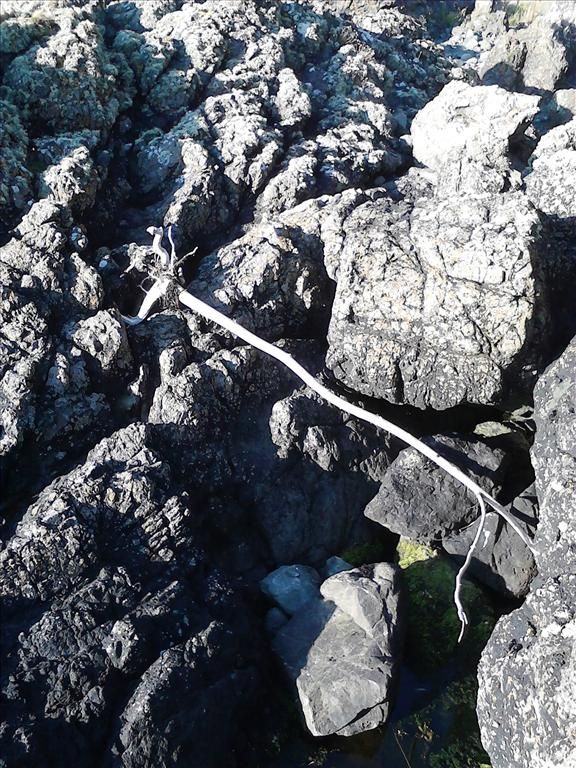
A sort-of sign of life.
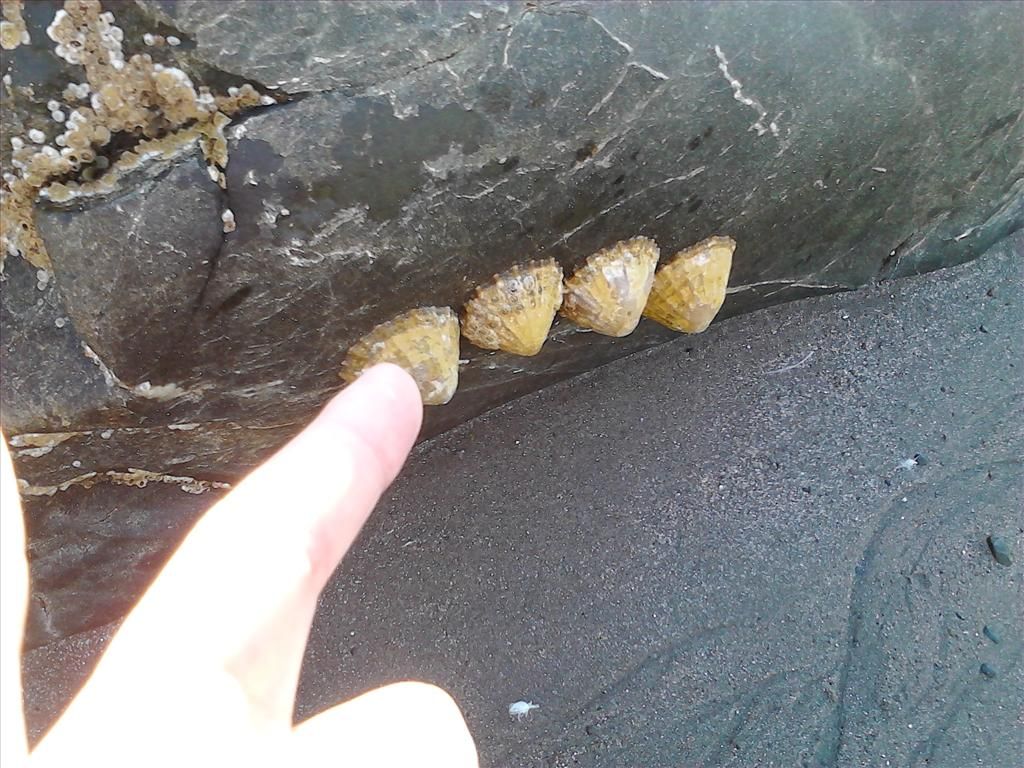
Aha! Hagshell clams. Avoid cheap farmed Haggis; they're often raised on Hagshell clams, which lends them a gritty texture.
What the Socrates! Sand! No more bouncing along like a billy-goat.
Not a soul around.
Doesn't this look tranquil? Actually, the wind was picking up. This easy going sandy stretch took me much further than I had meant to go!
I think that's Ailsa Craig in the middle distance. Uninhabited and still for sale, I believe.
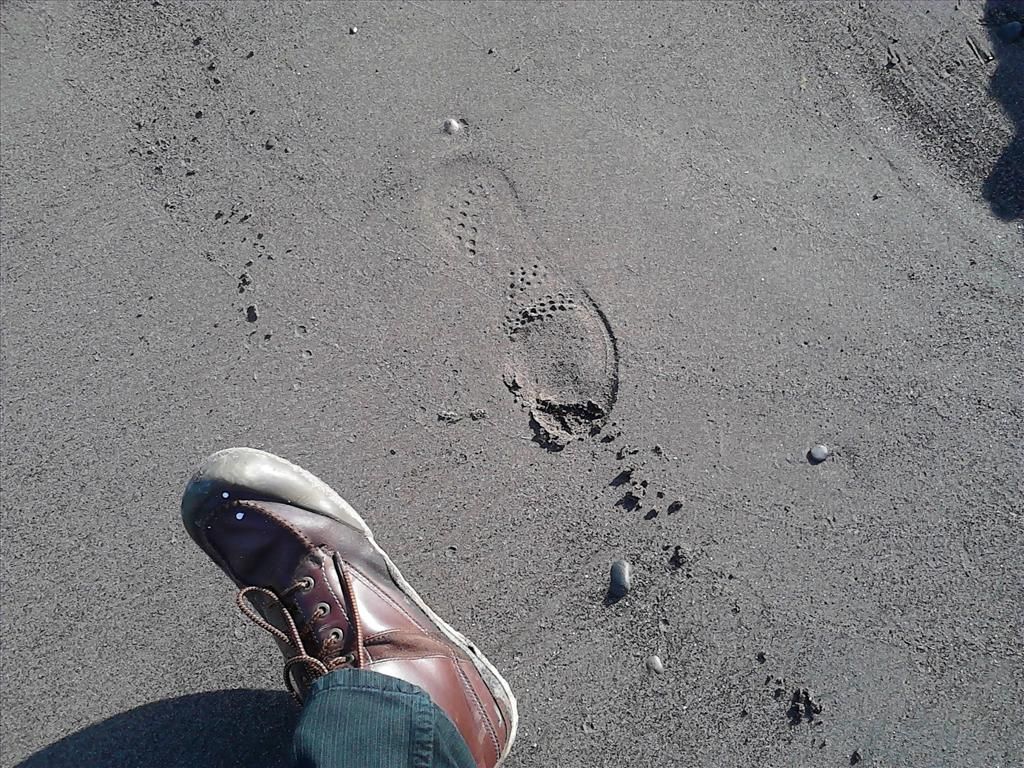
Time to head back. My own footprints were the only ones I ever found. Observe the lack of tread; these old boots have put up with a DAS course and static line parachuting, but are getting a bit past it!
Here's a wee clip to round off today's post. Till next time.
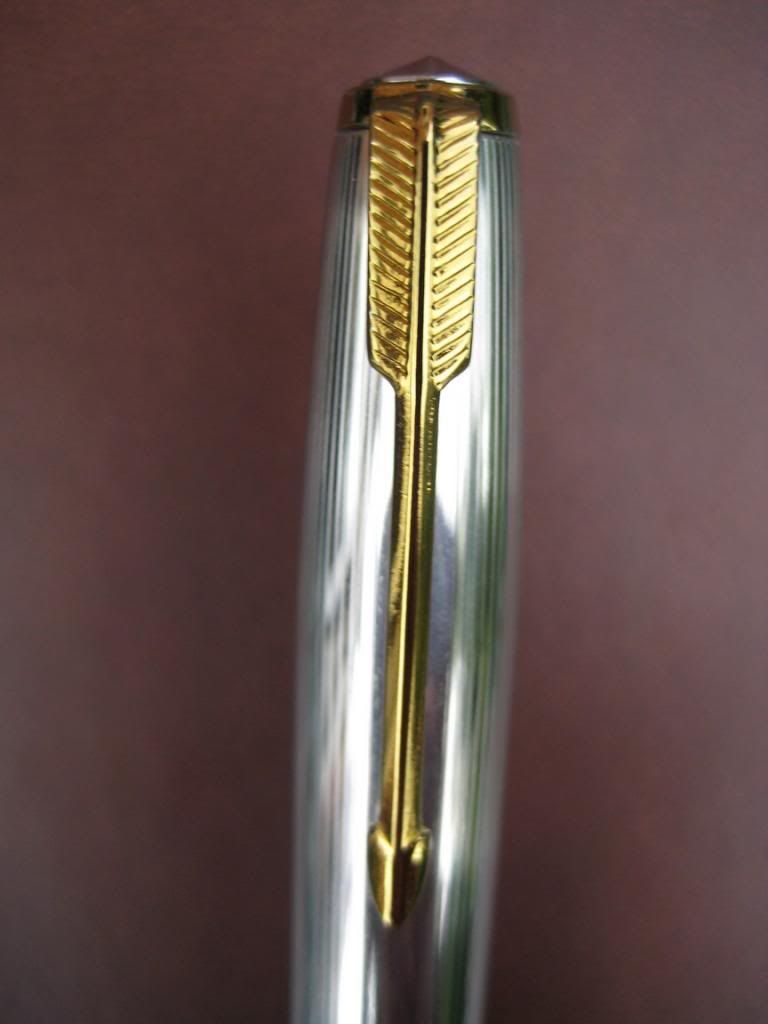
See what I did there? Yep, the hackneyed old swap-the-title-to-represent-the-swap gag. Today's post is the reverse of the last; a few photos showing a gold Hero 616 cap fitted with a chrome clip.
Ka-bling! Even with the clouds overhead, this combo is so shiny photography is a challenge.
There's shine, and then there's glare. The 616 is glaring at me.
The engraved line pattern and position of the band text is slightly different on the gold cap, I notice.
I shouldn't like this, but I do. The contrast is great. I like the idea of a workhorse pen that looks this eccentric.
It sort of works, doesn't it? Perhaps because of the slight satin quality to the gold colour of the cap body.
While I'm on the subject of caps, I'm in the market for a silver Parker 51 cap. I don't hold out much hope finding one, but you never know your luck.
A while back, I was browsing FPN and noted a fun wee 616 mod. A member named 'lint' had swapped the clips from gold and silver Hero 616 caps to create a nice two-tone effect. Now that thunder and lightning have been hurled down as just punishment for our warm and sunny July, I've dug out the screwdriver & blutack to follow in his footsteps.
Goldie clip, chromey cap, pretty pen.
At £3.78 for a gold-capped 616 from eBay seller YesPen, I'll say this is not too decadent a whimsy to indulge. The alternate gold cap/chrome clip combo is also quite striking, and you get a strong, small cardboard box and rigid plastic pen case too - very handy for reuse as decent pen packaging. As usual, the 616 Jumbo offers safe tinkering experience, this particular clip wanting far less tension to use on anything less than a permanent basis. Here's a few more pictures.
The stamping on the arrow feathers is actually pretty decent!
I've never quite got the hang of photographing shiny metal.
In the unlikely event anyone from Hero is reading; to commemorate your seven-billionth 616, or whatever, how about releasing a flighter model? I'd buy one - especially if the metal barrel had engraved lines like the cap!
For some inexplicable reason, this cap shape makes me think of Champagne.
Here's something I've not considered before; highlighting barrel imprints. I have to say, I'm delighted with the results, using a wax based china marker (akin to a crayon) as demonstrated in the fine Grandmia Pens video embedded below.
The marker used was a white Koh-I-Noor 3260/6 bought from eBay seller hobbyartandcraft, for £1.69 including shipping.
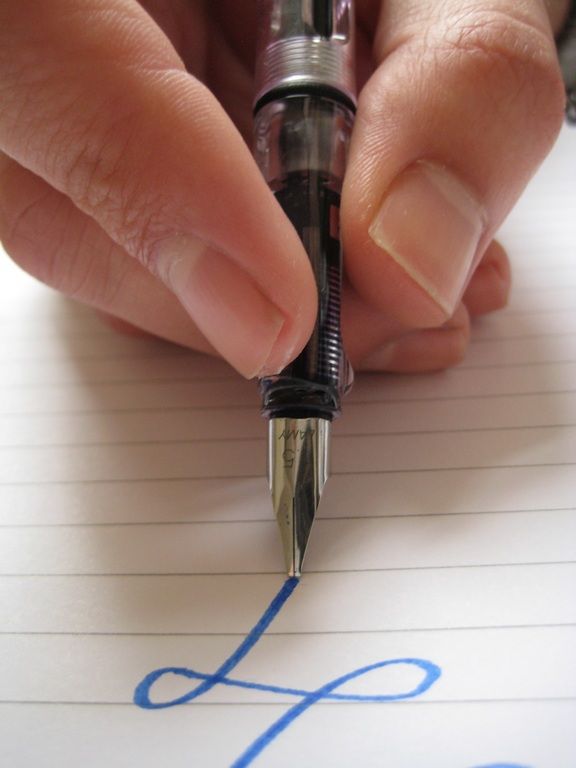
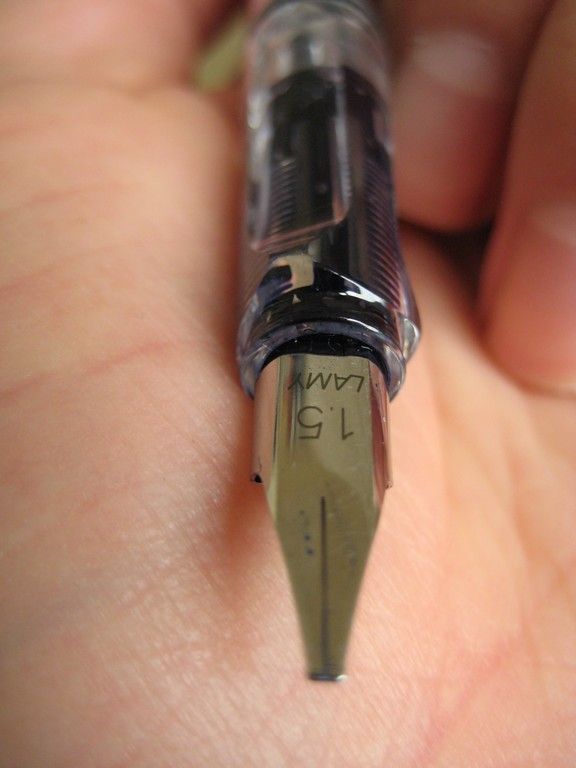
By rotating the Lamy Vista's nib & feed relative to the grip section, I can finally put ink to paper!
RESISTANCE IS FUTILE
As an inexpensive path to trying out a 1.5mm italic nib, a couple of months ago I bought a Lamy Vista, the transparent version of the popular Safari fountain pen. I've since found out two things: that I quite like the nib, and that I hate the Vista's grip section.
Like Parker's 75, the Lamy Safari/Vista has a bevelled,
'ergonomic' grip section. Unlike the 75, the nib cannot be rotated to
accomodate the user's hand. Instead, it is fixed in rotation relative to
the grip; a tab running the length of the feed slots in place between
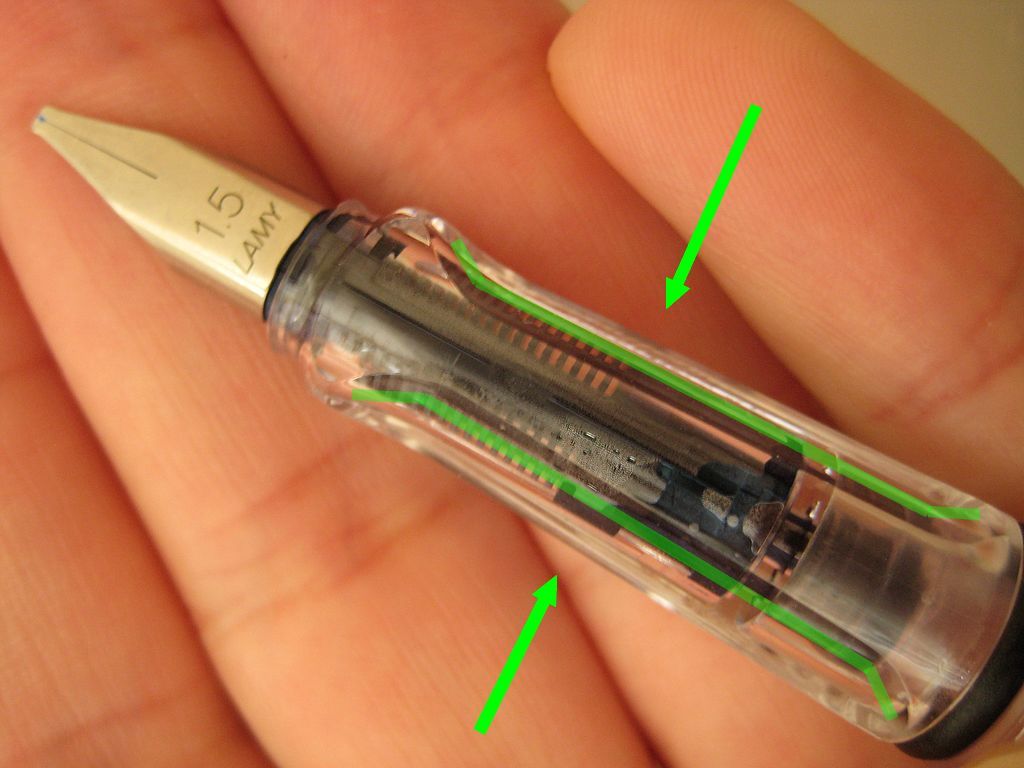
two dedicated channels within the section itself. The photo below shows the pen's section - two deep recesses run the length of the grip, forcing thumb and forefinger between them.
Arrowed and highlighted: the Lamy Vista's grip bevelling runs the entire length of the section.
Therein lies the problem; the nib is in perfect, equidistant alignment between the two recesses. Unfortunately, it is the curse of Man that this noble symmetry is an impossible aspiration; his ill-hewn thumb and forefinger are of different lengths.
Left: Palmar aspect of primate specimen Homo Sapiens. Contrast with that of specimen Homo Vista, right.
The inevitable consequence of my evolutionary shortcoming is a pronounced tilt to port. On horror's head, horrors accumulate; the width of the italic tines demands perfect alignment of nib to paper before any ink can flow through their gap. As shown below, I'm well off target when letting the section cradle naturally between thumb and forefinger!
Using the Vista's grip bevelling, so little of the 1.5 nib meets the paper that ink flow is prevented.
What's Been Changed
For the similarly unevolved, there is a crude DIY solution. Usual caveats apply, do so at your own risk, etc. etc. Having said that, I've been using the modified pen for about two weeks now, without any change in the way it writes; no feed flooding or starvation, no burping or splattering, no hard starting, no mess with repeated capping and uncapping. The nib is now rotated to the right of centre, allowing it to meet the page head on while thumb and forefinger still fall between the two grip recesses in a natural way. The nib and feed are still secure in the section, there's no looseness or play of any kind.
How
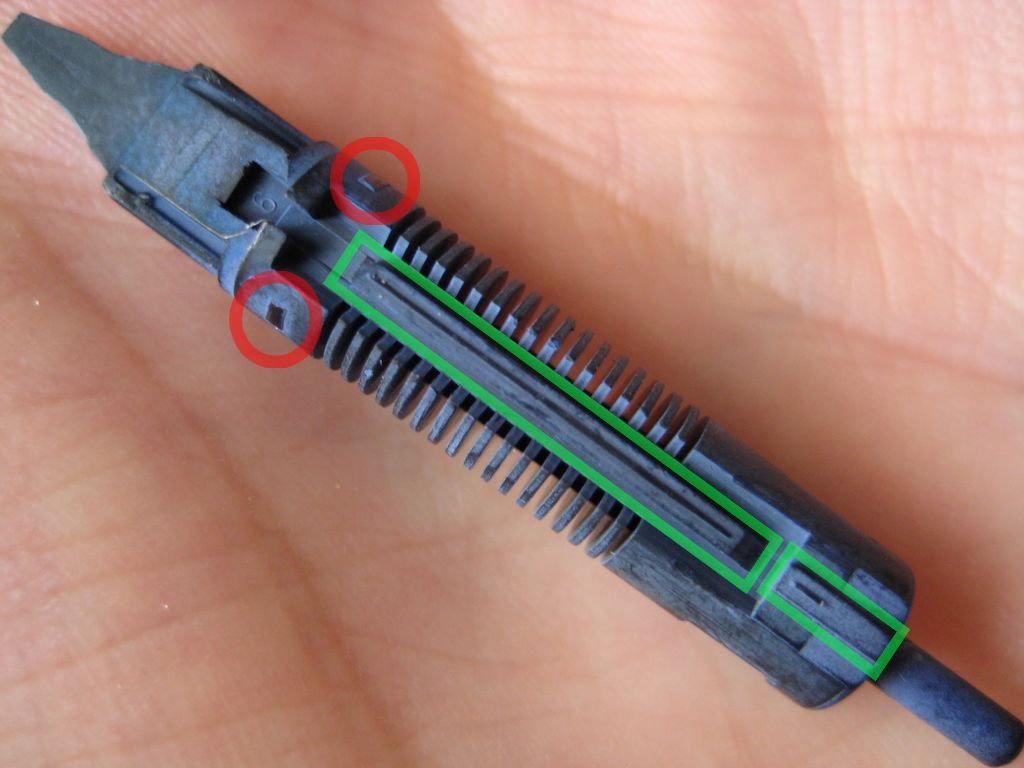
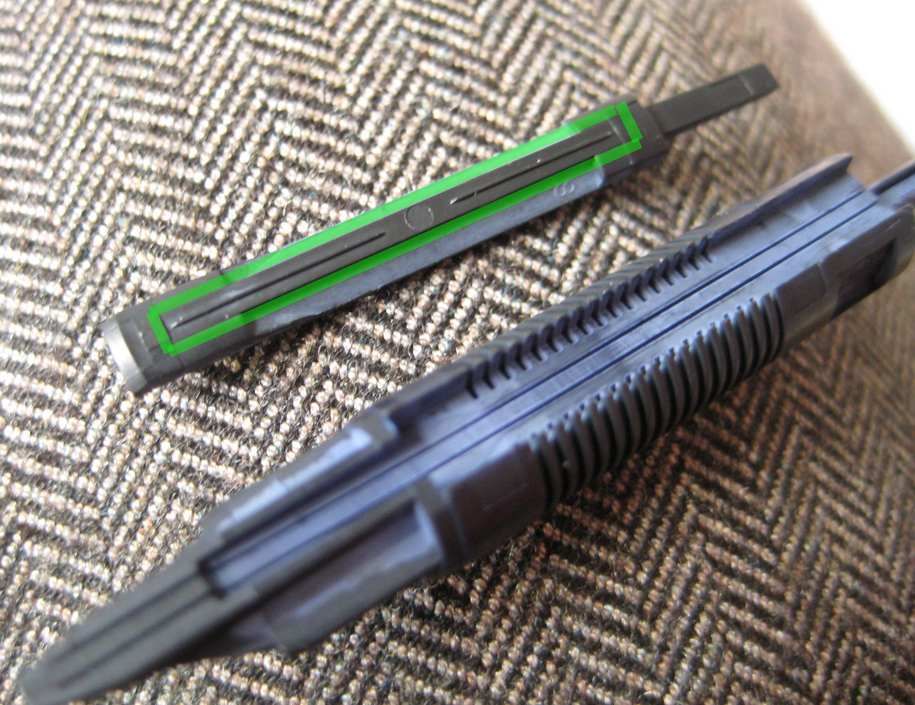
Have a look at this informative video on Ink Nouveau, the Goulet Pen Company's blog. The main obstacle to shifting the nib round is a large key running the length of the feed slots between two channels in the section, but there are a few more things to look out for too: a pair of slightly raised tabs in the section click into recesses at the feed's shoulders, and a raised area at the top of the feed helps it friction fit into place. Sanding and shaving at all of these allows the nib & feed to shifted round, while leaving enough material to ensure it stays securely in place.
The main task was the lopping off some of the key running the length of the feed's backside, highlighted in green below. The small tabs circled in red were left alone, so far as I remember.
For the chop: the feed key, highlighted in green.
A craft knife shaved off the offending key quite nicely.
Thus always to tyrants!
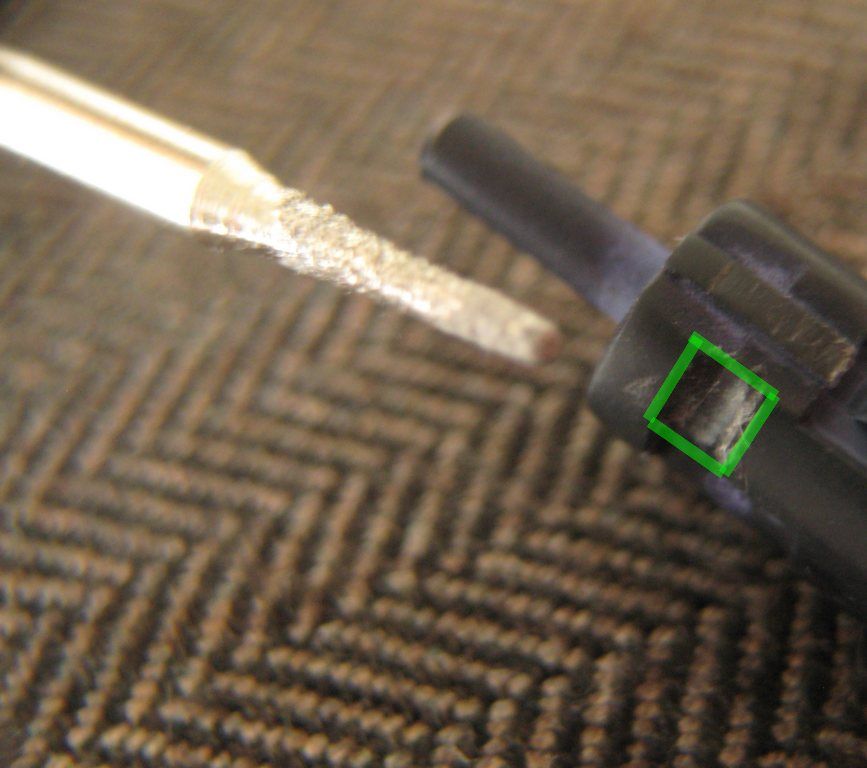
The slot for this key makes for a more prolonged annoyance. Reaming out the edges with a mini-drill ball attachement eventually wore them down enough ( I didn't trust myself enough to use the drill itself) . The inset in the photo below shows the offending edges face-on.
So not the boss of me: the Vista section's anti rotation slot.
The top of the feed also has a slight key to it, I couldn't see a corresponding section channel so I suppose it's more of an aid to friction-fitting. This part can be detached from the rest of the feed before shaving, so that swarf doesn't foul the ink/air channels and regulating fins.
Removing the detachable top key reveals the ink and air channels.
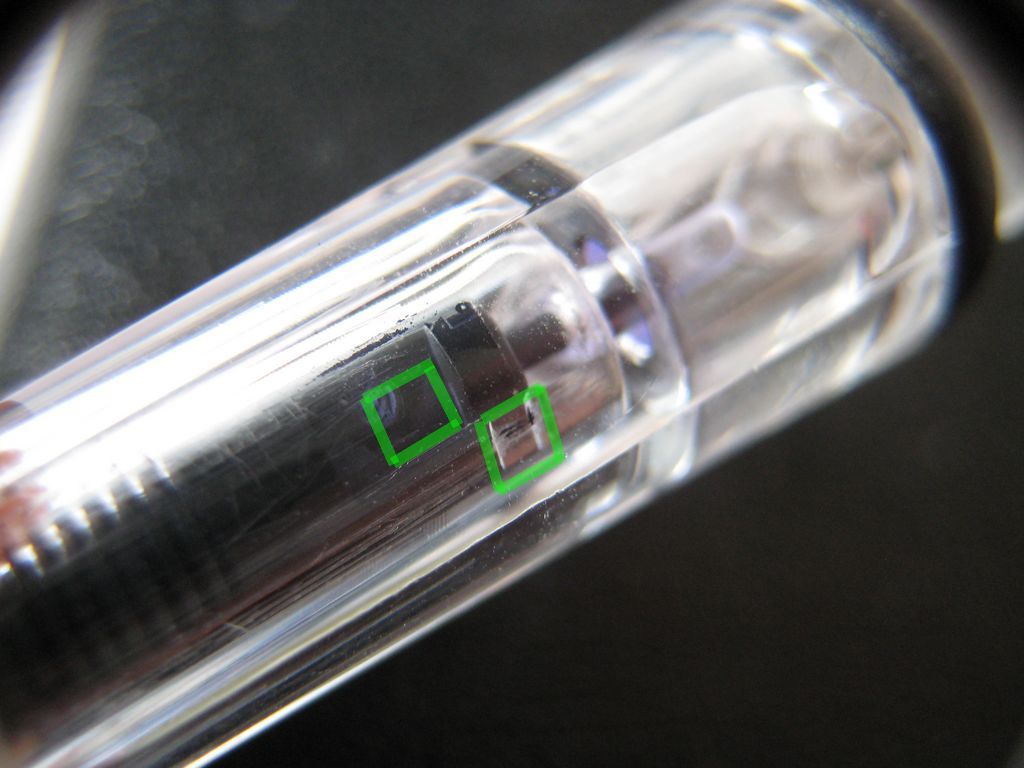
The last major obstacle was the two raised tabs towards the barrel end of the section. These click into slots in the feed, which were of course out of alignment when the feed was rotated to my preference. One of these tabs, and its corresponding feed slot, is highlighted in green below.
Lamy have certainly been very thorough with the feed assembly. Two blisters towards the rear of the section also keep it resolutely in place.
So that the feed could still click into place instead of just jam in with brute force, the feed slot was extended using a thin mini drill attachment.
The mini drill made light work of the soft plastic feed.
Is that it? I think that's it! I've reinserted the nib and feed to the right of the rotation slot. While the huge italic nib gets less use than my less specialised nibs, I do feel this slight change has made a big difference to the Vista's appeal.
After reassembly...
... and inking.
Oh, And One Last Thing
Herringbone trousers. Great for judging whether a subject's in focus or not.
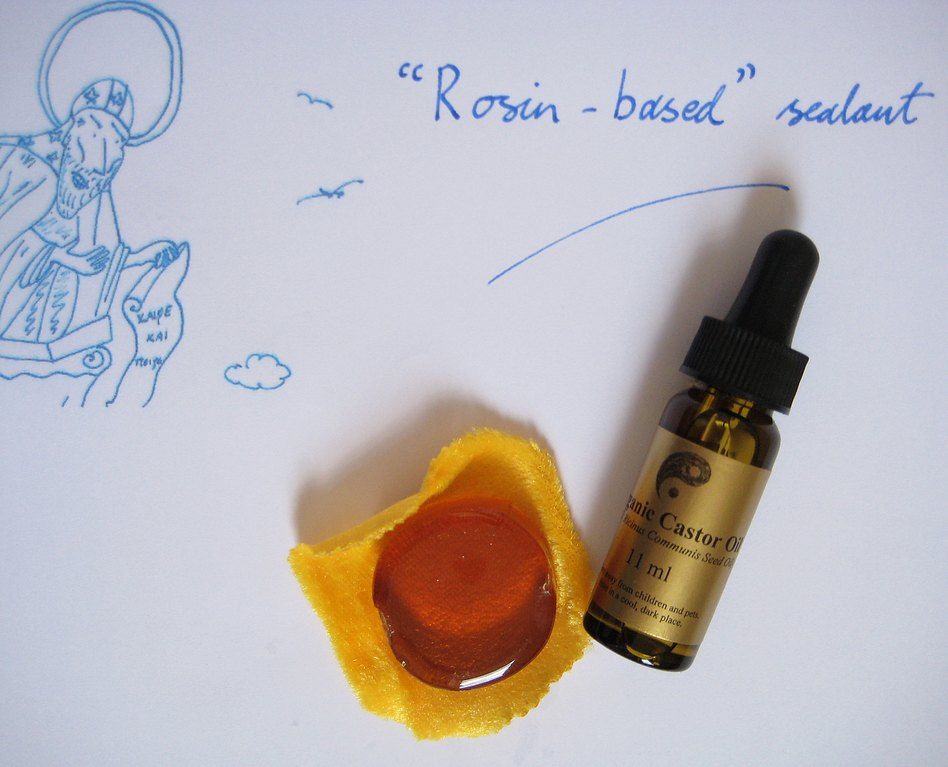
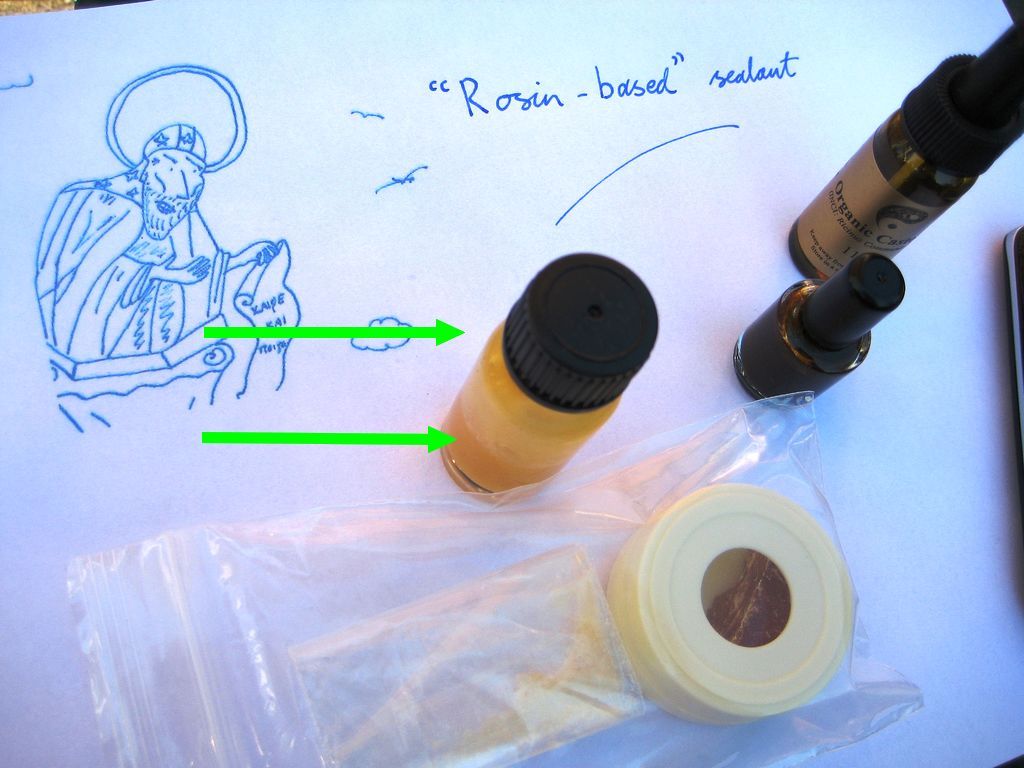
Appy-polly-loggies for the delay in posting this; here's the results of the thread sealant test using a Parker Frontier and "A.B." brand dark rosin, and a new batch based on "Hidersine" amber rosin.
I'm pretty much happy with how the goo behaves, so the experiments are at an end; time to just use the stuff! To that end, I've reopened the plunger filling Kaigelu 316, and replaced the shellac with section sealant. This should make future disassembly easier; I can't get the manual valve idea out of my head, so ease of access to the pen's insides might come in handy sometime in the future.
Here's a second attempt at mixing "rosin based" fountain pen thread sealant, this time eschewing the safety of the bain-marie. This gave encouraging results using a cake of dark "A.B." brand rosin, so, using more heat, I gave the amber coloured "Theodore" rosin another chance too!
After some very helpful input from the wider community of enthusiasts - see thesethreads at the Fountain Pen Network and Fountain Pen Geeks forums - I think this second batch is an improvement. I've some harder amber rosin on the way, so I will save the results of the Frontier thread test for when that's cooked up.
This has been a fascinating few days! I was a very poor chemistry student, with "a rudimentary knowledge of some areas... [and] great gaps in his understanding", so it's not often I turn my hand to natural philosophy. I've been particularly surprised by the powerful stickiness of the resultant rosin/oil sealant. By means of heat and castor oil, the shade of the original tree's rosin-locked spirit is lent a grasping vitality, as if seeking to lay down roots anew!
Let's Be Careful Out There
This remarkable stickiness is something for the plucky amateur to be cautious of. Though the turpentine is removed, rosin is still flammable. It won't dissolve in water (thanks for that Kristine!), and as shown in the clip above, this mixture is very sticky indeed. Add an open flame to a spillage and one might well say "horrifically" sticky. It brings to mind Anna Comnena's description of a hand held variant of Greek Fire used during a counter-sapping effort in the defence of Dyrrachium;
"Now this fire was chemically prepared in the following manner. From the pine and other similar evergreen trees they gather resin, which burns easily. This is rubbed with sulphur and introduced into reed tubes. A man blows on it with strong, sustained breath, as though he were playing a pipe, and it then comes in contact with the fire at the end of the tube, bursts into flames and falls like a flash of lightning on the faces of those in front of it."
I don't usually write imperatives in this blog, but with that awful image in mind, please use every precaution if heating this stuff.
Diverting MindThots
A few millennia-connecting details I found kind of neat during this wee project:
According to the September 1st, 673 - August 31st, 674 entry of the Chronicle of Theophanes,
"In this year the expedition of the enemies of God anchored in Thracian
territory...At the time Kallinikos, an artificer from Heliopolis, fled
to the Romans. He had devised a sea fire which ignited the Arab ships
and burned them with all hands." In the entry for 812-813, it's spare
underpants time, after "The Bulgars took Mesembria and Debeltos as well,
in which places they found thirty-six bronze siphons and not a little
of the liquid fire shot through them".
21st Century - describing the qualities of Parker's rosin based thread sealant, Ron Zorn mentions that this sticky stuff will dissolve in naphtha.
In the Administrando Imperio, his handy 10th Century guide to empire maintenance, Constantine
Poryphyrogenitos warns of the "care and thought you must take in the
matter of the liquid fire which is discharged through tubes", and goes
on to list the locations of numerous "naphtha wells", "some of them
being red, some yellow, and some blackish".
Writing in the 1st Century, Pliny references Pytheas' On the Ocean, who reported Germanic tribes using amber for fuel.
Anna Comnena's 12th Century Alexiad includes a short note describing the use of tree resin in the preparation of a portable version of "chemically prepared" fire.
In yesterday's post, I had a go making "rosin based" fountain pen thread sealant, letting it cool overnight and leaving you with the thrilling cliffhanger "So, does it work?" Today, I opened the bottle to investigate. Now read on...
Well, the good news is that the rosin sealant had not hardened at room temperature overnight, so I must assume that there is at least the required minimum amount of castor oil in the mix. It's certainly very thick as it is - thicker than shellac, certainly. I tested a tiny amount of the goo on a ballpoint's threads, and the results were encouraging... A picture says a thousand words, as the saying goes. Here's 7 minutes of pictures at 30 frames a second!
I'll finish writing this post, and apply some of the rosin based sealant to the threads of the Jinhao 321 shown in the video - I'll be sure to let you know how it works out in future posts.
In this post, I'll be cooking up some "rosin based" fountain pen sealant. This mysterious goo is supposed to be a good alternative to shellac, in situations where a lower release temperature is preferred (such as the "I still can't get this apart, and if I apply any more heat it will melt in my hands" situation).
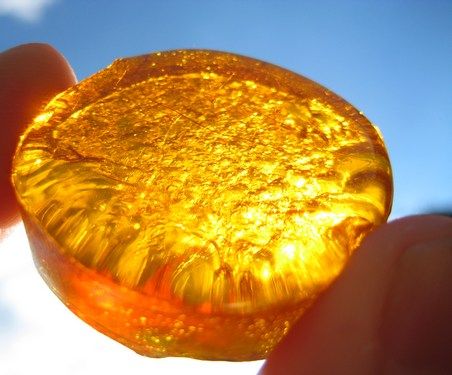
A block of rosin. How it glowses, my precious!
This is uncharted territory for me, I've never clapped eyes on "rosin based" sealant before. From various sources dotted about the web, I gather it's rosin dissolved in castor oil, heavy on the rosin. That's about as much as I know. Any right thinking amateur would reach for a credit card at this point, but to the best of my knowledge, there is no domestic UK source of premixed rosin based sealant. US based Main Street Pens springs to mind as an easy solution for American readers (or if you can think up a few more things to make international shipping worthwhile).
To begin with, I was dead against having to stock up on anything in bulk. If that had been necessary, I would honestly have preferred to just buy a handy 10ml vial, treading a big ugly carbon footprint from New York to Glasgow. I have exactly one drawer for pen-type tools - well, two, if you count the spark plug pliers (they've yet to meet any spark plug boots). There's no space for a litre of castor oil!
Ingredients
For £2.48 including postage, eBay seller Aina TM provided 11ml of "Organic Castor Oil BP" (amongst a jungle of unintelligible pharmaceutical properties, this variant seems to have lower acidity), while a 4cm diameter disc of 'Theodore' violin rosin cost £1.88 from DJMusic.
Rosin, check. Castor oil, check.
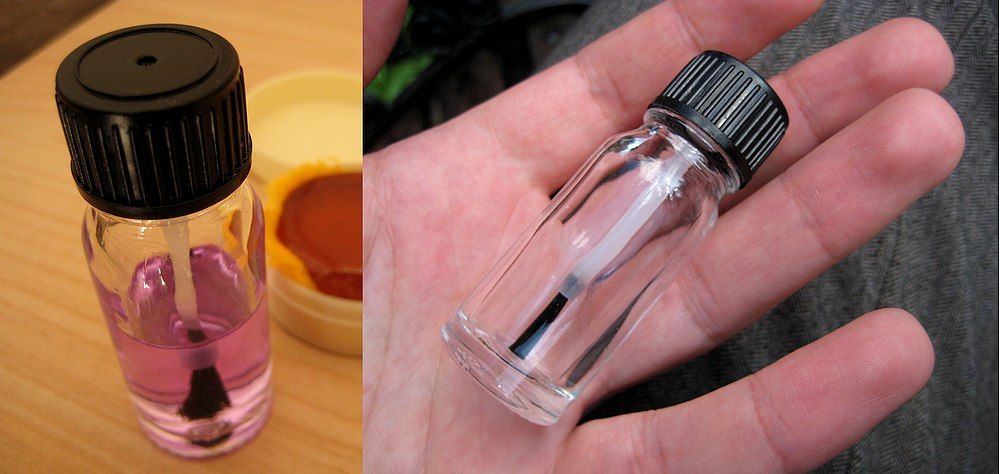
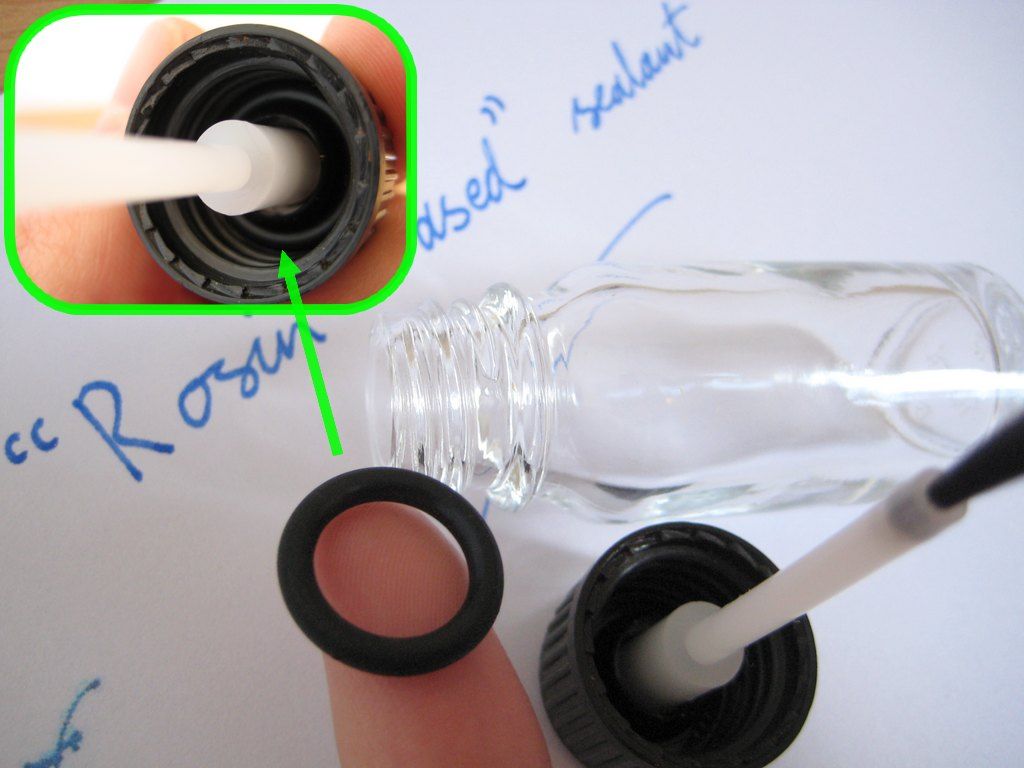
Preparing a glass storage vial
I had just the thing to store the potential sealant in - a 10ml glass vial, with an integrated application brush. This originally contained shellac, but what little that was left had long since gone off. An overnight soak in methylated spirits made light work of the shellac residue, and in turn, an overnight soak in soapy water made light work of the methylated spirits smell (I can't stand it).
Cleaning, and clean. A 10ml glass vial with screw-cap and application brush.
I added an O-ring to help keep the vial air tight. Weirdly, there is a recess in the plastic cap ready for a rubber gasket to fit into place, but it didn't come with one installed.
Adding a cap gasket.
I'm much happier with a gasket in there, hopefully it will lend a really good seal. Let's move on to the rosin.
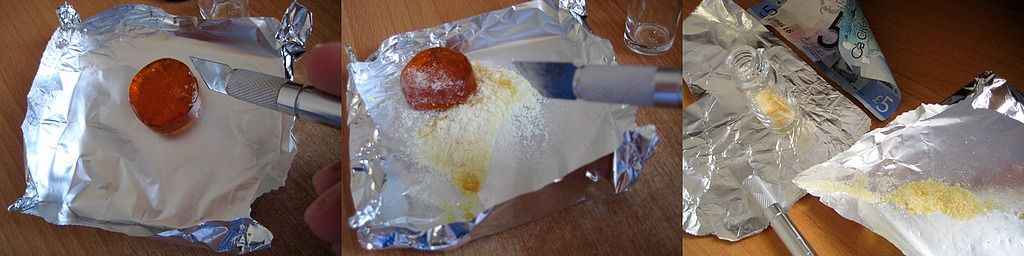
Breaking Down the Rosin Cake
This is a 4 centimetre diameter cake of "Theodore" violin rosin, bought specifically for its hypnotising amber radience, and the seller's mention of this variety's "slightly sticky interior texture offering plenty of grip". I found that rubbing the blade of a craft knife against the cake easily shaved the surface down to a fine powder, which could be poured into the glass vial.
"Theodore" violin rosin. Not quite double-rainbow awesome, but still quite captivating.
As this step was bound to make a mess, I broke down the rosin in a piece of baking foil. This made a decent funnel too, for pouring the powdered rosin into the glass vial.
Breaking down the rosin, and filling up the vial.
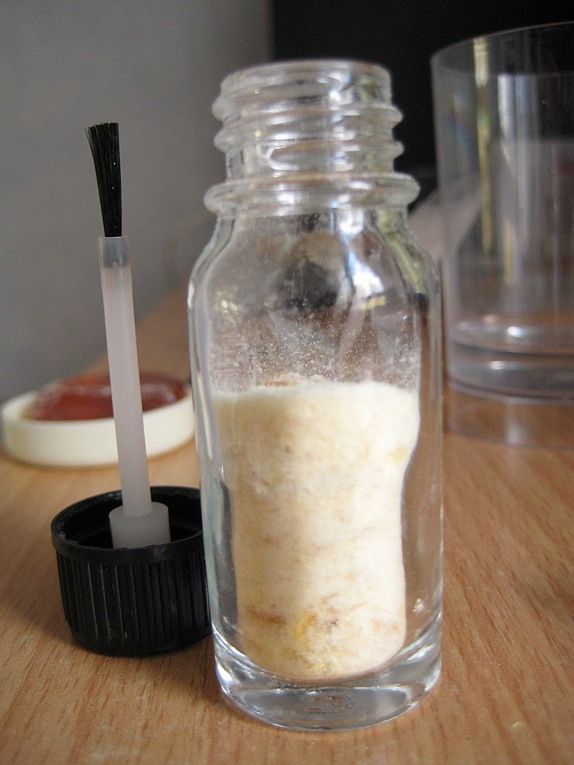
Mixing In Castor Oil
The ratio of rosin to castor oil I was aiming for was 60-70 percent rosin, by volume. I came across that figure by way of a link in a great FountainPenBoard thread. That gem of a hint had been preserved in an abandoned, late '90s, Times-New-Roman-with-some-Hyperlinks type page still maintained by Syracuse University. It really kick-started this endeavour, so my thanks go out to a certain Vincent Fatica, who included an informative sojourn into the background and preparation of rosin sealant with his own recollections of making the stuff. Prior to reading this, the only other clue I had to work off was a mention of rosin based sealant being more viscous than shellac, which I had to hand as a gloopy frame of reference.
About to pour in some castor oil.
I'm no Archimedes I'm afraid; it was quite taxing on the old noggin to work out 70% of the vial's volume, allowing for the applicator brush's displacement, and leaving empty space for later adjustment to the mix. I decided to err on the side of caution, and aim for less than a full vial of sealant. That way, if I messed up the proportions, I could add rosin powder if the sealant turned out too runny, or more castor oil, if it was too viscous.
Anyhoo, I reached over to the bottle of castor oil, squeezed the integrated eyedropper, and started mixing a squirt into the rosin powder, using a large darning needle. I figured if I didn't get the rosin wet enough beforehand, heating it up would just melt it into a lump and I'd be back where I started.
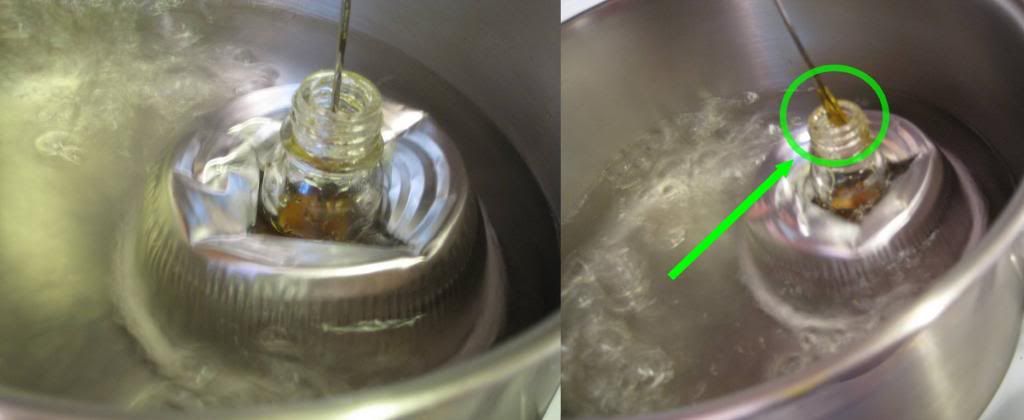
To help the mixture heat evenly, I sat the vial in a hot bain-marie, over a medium flame. This had the unfortunate effect of fogging the camera lens in short order! The overturned foil pudding cup in the photos below was just a precaution against the vial tipping over in the bubbling water.
Heating the rosin/castor oil mix (I left the darning needle in situ). Arrowed - checking texture.
I let the vial heat up for about 14 minutes, stirring occassionally. The darning needle came in handy as a sort of viscosity dipstick too! Here's a short clip to help illustrate the mixture's thickness.
After cooling, I noticed the sealant was still quite thick. If inverted, it takes quite a while longer than the shellac to shift from the top of the bottle to the bottom (as arrowed in the photograph below).
Arrowed - rosin based sealant, slowly shifting from the top to the bottom of the bottle.
Well, does it work?
I'll leave the vial alone overnight, and if it's still liquid enough tomorrow, try it out on some ballpoints before moving onto to fountain pens. I'll keep you posted!
Thanks, No Thanks!
Thanks!
Hugely helpful sources I used as a guide. Thanks all.